Don’t Get Stranded: How to Service and Repair Your Golf Cart Batteries

Golf cart battery service: Ultimate 5-Step Guide

Why Golf Cart Battery Service is Essential for Reliable Performance

Golf cart battery service is the key to keeping your cart running smoothly and avoiding unexpected breakdowns. Whether you use your golf cart for golfing, getting around your community, or working on your property, proper battery maintenance ensures reliable performance and extends the life of your investment.

Quick Answer: What Golf Cart Battery Service Includes

  1. Checking water levels in flooded lead-acid batteries (monthly)
  2. Cleaning terminals and connections to prevent corrosion
  3. Inspecting cables for damage, cracks, or wear
  4. Charging properly after each use with the correct voltage
  5. Testing performance to identify failing batteries early

Let’s face it: golf cart batteries aren’t cheap. A new set of 4-6 batteries can cost hundreds or even thousands of dollars. But here’s the good news – proper maintenance can extend your battery life from 4-5 years to 6-8 years, saving you significant money over time. More importantly, regular service prevents you from getting stranded mid-round or mid-commute.

The average battery life varies dramatically based on care. With heavy use (8+ hours daily) and no maintenance, batteries might only last 2-4 years. However, batteries that receive consistent attention can perform reliably for much longer. That’s a difference of thousands of dollars and countless hours of dependable service.

I’m Ralph Harris, and with over 20 years of experience in electronics repair, I’ve serviced hundreds of battery systems across various applications, including golf cart battery service for both residential and commercial clients. Through this guide, I’ll show you exactly how to maintain your batteries and when professional service makes sense.

infographic showing five key steps of golf cart battery maintenance: 1. Check water levels monthly and add distilled water after charging, 2. Clean terminals with baking soda solution and apply petroleum jelly, 3. Inspect cables and connections for damage or corrosion, 4. Charge properly after each use with correct voltage settings, 5. Test performance and replace batteries showing signs of failure - Golf cart battery service infographic

Signs Your Battery Needs Service or Replacement

Your golf cart often gives subtle clues when its batteries are struggling. Ignoring these warnings can lead to a complete breakdown, leaving you stranded. Recognizing these signs early means you can address issues before they become major problems, potentially saving you from needing a full battery replacement.

Here are the most common indicators that your golf cart battery needs service or replacement:

  • Reduced Cart Speed: If your cart isn’t zipping along like it used to, or struggles to reach its top speed, weak batteries are often the culprit.
  • Shorter Range Per Charge: Are you finding yourself needing to charge more frequently, or does your cart die sooner than expected? This is a classic sign of declining battery capacity.
  • Slow Acceleration: If your cart feels sluggish when you press the pedal, struggling to get up to speed, the batteries might not be delivering enough power.
  • Dimming Lights or Accessories: Headlights, taillights, or other electrical accessories that appear dim or flicker, especially under load, indicate a lack of consistent power from the battery bank.
  • Swollen or Cracked Battery Cases: This is a serious sign of internal damage, often caused by overcharging or extreme heat. Swollen batteries are dangerous and should be handled with extreme caution and replaced immediately.
  • Leaking Acid: Any visible liquid around the battery terminals or on the battery tops points to a leak. Battery acid is corrosive and dangerous, and a leaking battery is a clear sign it needs immediate attention and replacement.
  • Batteries Older Than 4 Years: While some batteries can last 6-8 years with excellent care, batteries older than 4 years tend to fail faster. If your lead-acid batteries are approaching or past this age and you’re noticing performance issues, it’s a strong indicator that replacement is nearing. For expert diagnosis and solutions, check out our more info about battery repair services.

Visual Inspection Checklist

A quick visual check can reveal a lot about your battery’s health. We recommend making this a part of your routine golf cart battery service:

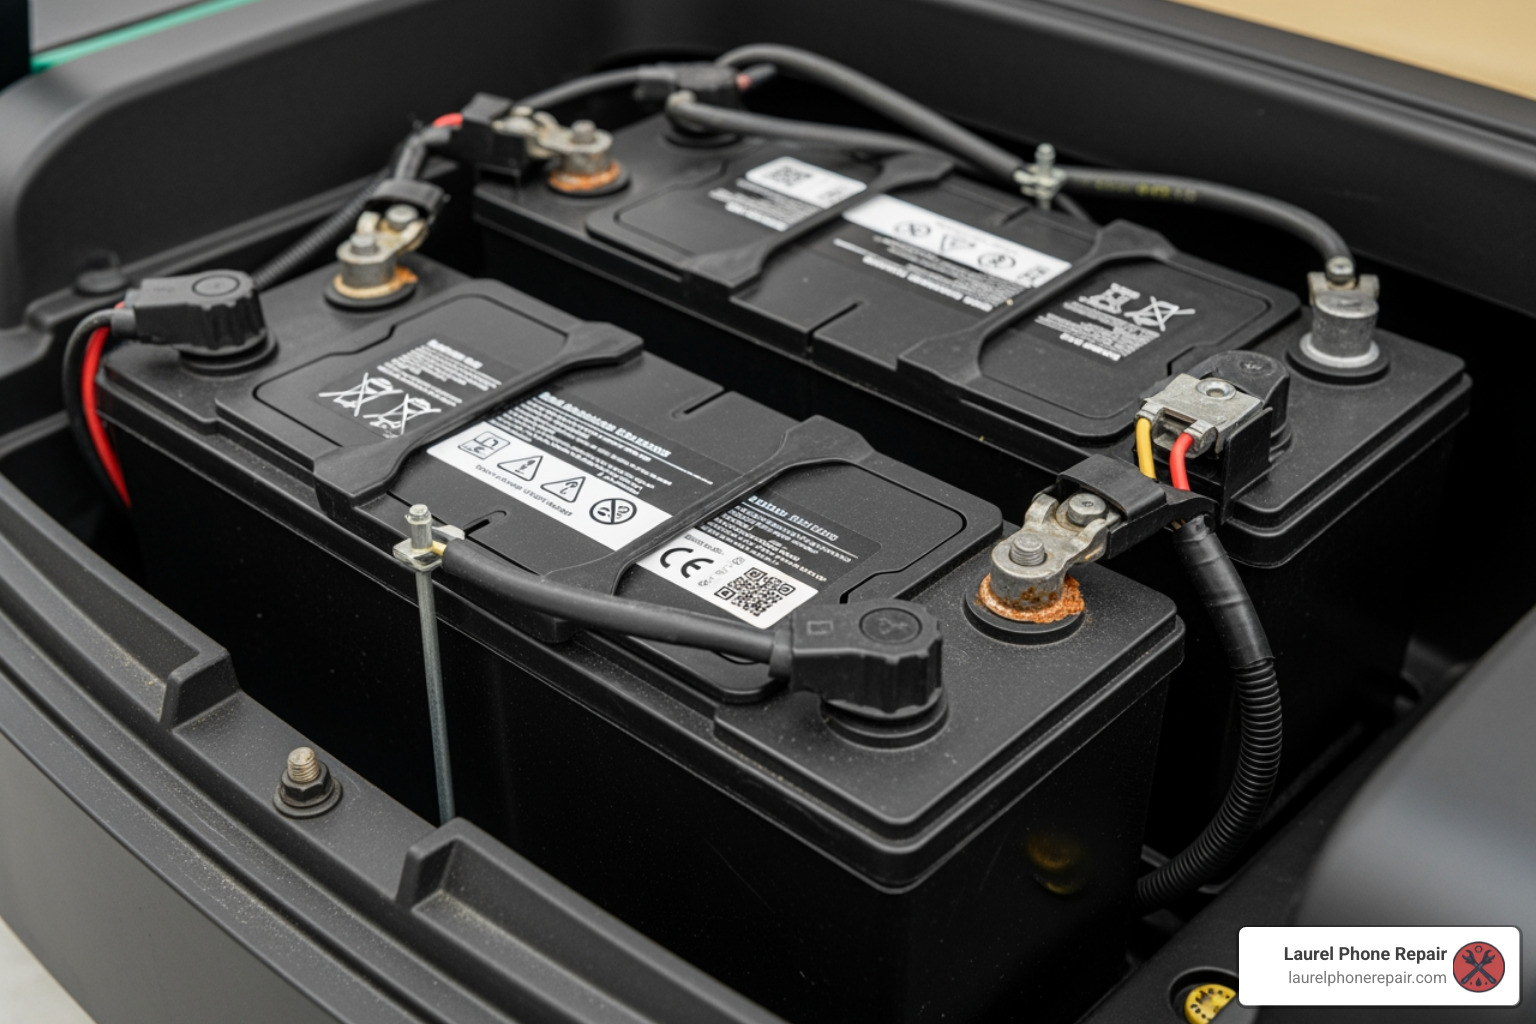
  • Corrosion on terminals: A white, green, or blue powdery substance on the battery terminals indicates corrosion. This impedes electrical flow and can reduce performance.
  • Frayed or damaged cables: Look for any cuts, cracks, or fraying on the battery cables. Damaged cables can lead to resistance, power loss, and even short circuits.
  • Cracks in the battery casing: Even hairline cracks can allow acid to leak and moisture to enter, severely damaging the battery.
  • Low water levels in lead-acid cells: For flooded lead-acid batteries, visually check that the water level covers the internal plates. If not, they need distilled water immediately.
  • Bulging or swelling sides: As mentioned, this is a critical sign of internal pressure and damage. Do not attempt to charge or use a bulging battery.

Performance-Based Indicators

Beyond visual cues, your cart’s performance is a direct reflection of its battery health. Pay attention to these symptoms:

  • Cart struggles on hills: If your golf cart noticeably slows down or loses power when going uphill, the batteries are likely not delivering sufficient current.
  • Takes longer to charge: While charging times can vary, a significant increase in the time it takes for your batteries to reach a full charge can indicate internal resistance and declining health.
  • Doesn’t hold a charge as long: If you charge your cart overnight but find it loses power quickly during use, its capacity has diminished.
  • Slower than usual top speed: A gradual decrease in your cart’s maximum speed is a common sign of weakening batteries.

Here’s a list of common performance decline symptoms to watch for:

  • Reduced acceleration
  • Lower top speed
  • Shorter driving range
  • Headlights dimming at slow speeds
  • Charger running longer than usual
  • Unusual noises from the battery compartment (hissing, bubbling – indicating overcharging or internal issues)

The Ultimate Guide to Golf Cart Battery Service

Proper golf cart battery service isn’t just about fixing problems; it’s about preventing them. By following a routine maintenance schedule, you can significantly impact your batteries’ lifespan and ensure your golf cart performs optimally for years. Safety first! Before you begin any maintenance, make sure you understand the risks. For a comprehensive guide on battery care, you can also refer to How to Perform Golf Cart Battery Maintenance.

Essential Safety Precautions

Working with golf cart batteries involves handling corrosive chemicals and high electrical currents. Safety should always be your top priority.

person wearing safety glasses and gloves working on a battery - Golf cart battery service

  • Wear Personal Protective Equipment (PPE): Always wear safety glasses or a face shield, chemical-resistant gloves, and old clothing. Battery acid can cause severe burns and damage.
  • Work in a Ventilated Area: Batteries can release hydrogen gas, which is flammable and explosive. Ensure good airflow to prevent gas buildup. Never work in an enclosed space without ventilation.
  • Use Insulated Tools: Metal tools can cause a short circuit if they accidentally touch both terminals or a terminal and the cart’s frame. Use tools with insulated handles to minimize this risk.
  • No Smoking or Open Flames: Keep all sparks, flames, and smoking materials away from batteries. The hydrogen gas released during charging can ignite.
  • Baking Soda for Acid Spills: Keep a box of baking soda and water nearby. A solution of 1 cup of baking soda for every gallon of water can neutralize spilled battery acid. If acid gets on your skin or in your eyes, flush immediately with water for at least 15 minutes and seek medical attention.
  • Disconnect Power: Before performing any maintenance, turn off your golf cart and disconnect the main battery pack from the cart. This usually involves disconnecting the negative terminal of the main battery first.
  • Proper Lifting: Golf cart batteries are heavy. Use proper lifting techniques or get help to avoid injury.

For more detailed guidance on handling batteries safely, refer to this resource on More on battery safety.

Step-by-Step: Maintaining Flooded Lead-Acid Batteries

Flooded lead-acid batteries are common in golf carts and require regular attention. This routine will help maximize their lifespan and performance.

  1. Check Water Levels (Monthly):
    • Timing is Key: Always check water levels after fully charging the batteries. However, before charging, ensure the water level is high enough to cover the plates. If the plates are exposed before charging, add just enough distilled water to cover them, then charge.
    • Procedure: Open the vent caps on each battery cell. Look inside to see the electrolyte level. It should be approximately 1/8″ below the bottom of the fill well or vent cap opening once fully charged.
    • Adding Water: Use only distilled or deionized water. Never use tap water, as minerals can build up and reduce battery life. Never add acid to a battery.
    • Fill Level: Do not overfill! Overfilling can cause acid to overflow during charging, leading to corrosion and acid loss.
    • After Filling: Securely replace and tighten all vent caps.

distilled water being added to a battery cell - Golf cart battery service

  1. Cleaning Terminals and Connections (Every Few Months):

    • Corrosion Removal: Mix a solution of 1 cup of baking soda per gallon of water. Use a stiff, non-metallic brush (like an old toothbrush) to scrub away any corrosion on the battery terminals and cable ends.
    • Rinse and Dry: Rinse the area with clean water (careful not to get water into the battery cells) and thoroughly dry the terminals and cables.
    • Prevent Future Corrosion: Once clean and dry, apply a thin layer of petroleum jelly, battery terminal protector spray, or a specialized anti-corrosion grease to the terminals and cable ends.
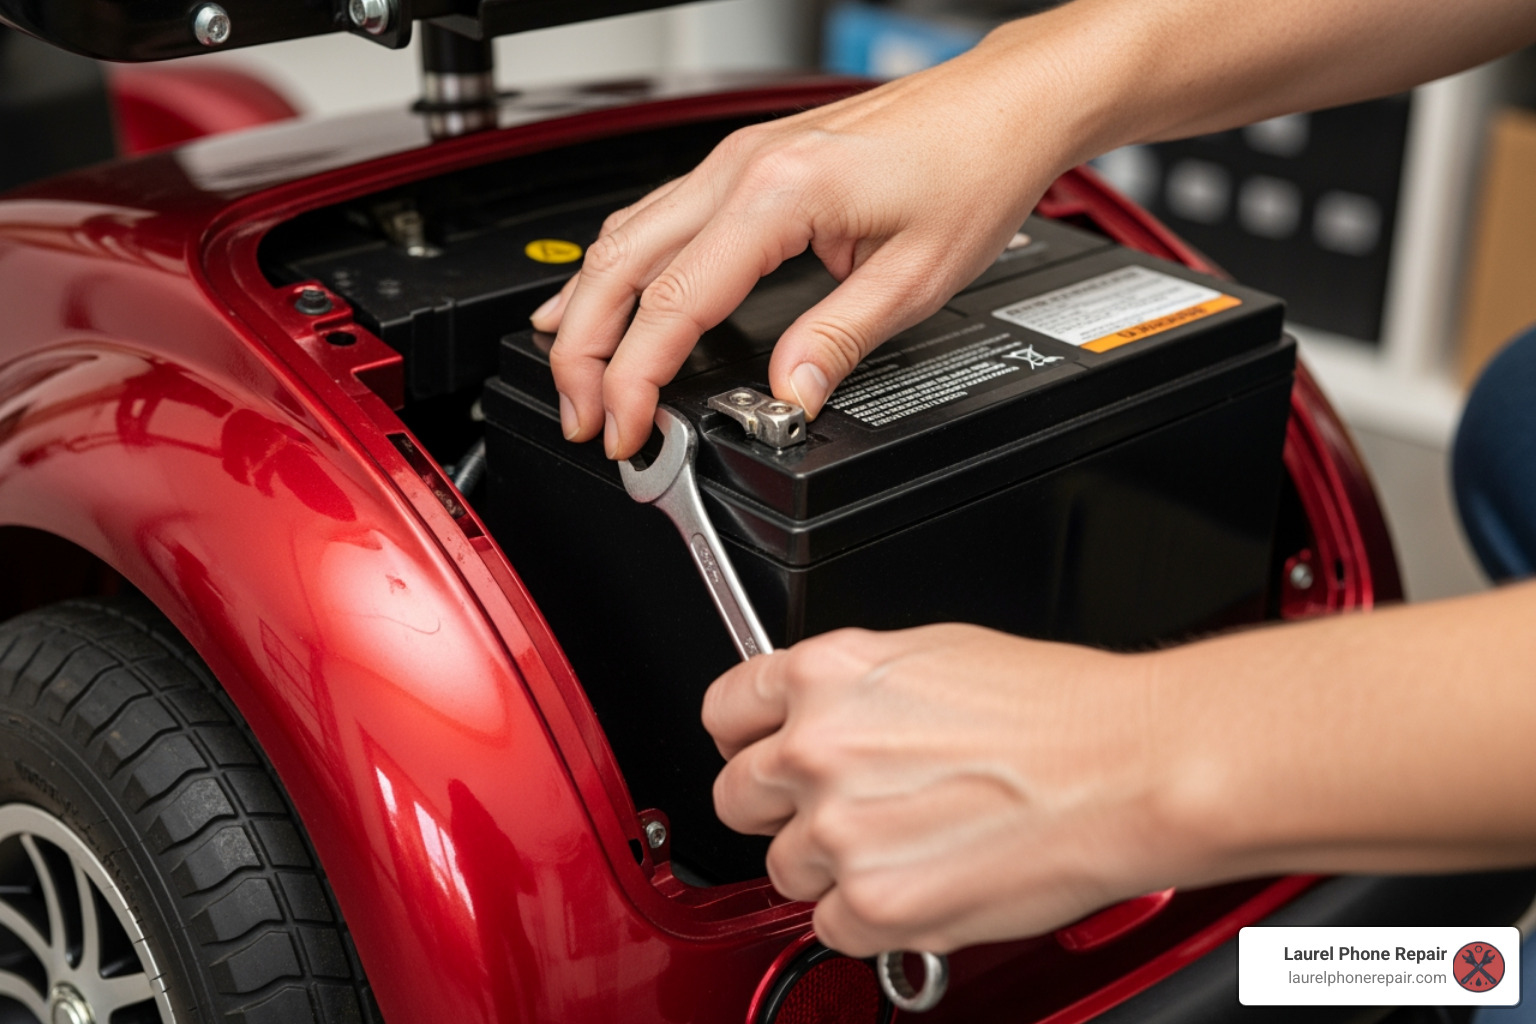
  2. Checking Connections and Torque Specifications:

    • Inspect Cables: Look for any signs of wear, fraying, or damage on all battery cables. Replace damaged cables immediately.
    • Tighten Connections: Using an insulated wrench, ensure all battery cable connections are snug. Loose connections can create resistance, generate heat, and reduce power delivery.
    • Torque Specifications: Proper torque is crucial. For 5/16” studs or bolts, aim for 100-120 in. lbs. (11.3-13.6 N-m). For 3/8” studs or bolts, the range is 120-180 in. lbs. (10-15 ft. pounds or 13.6-20.3 N-m). Overtightening can damage terminals, while undertightening causes resistance.

Maintenance Differences: Lead-Acid vs. Lithium

The world of golf cart batteries is evolving, and maintenance requirements vary significantly depending on the battery chemistry.

  • Flooded Lead-Acid Batteries: These are the traditional workhorses, known for their affordability. However, they demand the most maintenance. As detailed above, regular watering, terminal cleaning, and careful charging are essential. Their average lifespan is typically 4-5 years, though diligent care can push this to 6-8 years. They are sensitive to deep discharges and temperature fluctuations.

  • AGM (Absorbed Glass Mat) and Gel Batteries (VRLA – Valve Regulated Lead Acid): These are sealed lead-acid batteries, meaning they require no watering. This makes them “maintenance-free” in that regard, though they still benefit from clean terminals and proper charging. They are less prone to spilling and can be mounted in various orientations. Their lifespan is often similar to or slightly better than flooded lead-acid, but they are more sensitive to overcharging.

  • Lithium Batteries (LiFePO4): These are the game-changers in golf cart technology. Lithium batteries are virtually maintenance-free, offering a significantly longer lifespan of 5-10 years. They are lighter, charge faster, provide consistent power throughout their discharge cycle, and often come with a sophisticated Battery Management System (BMS) that protects them from overcharging, over-discharging, and temperature extremes. While the upfront cost is higher, their extended lifespan and lack of maintenance often make them more cost-effective in the long run.

Here’s a quick comparison:

Feature Flooded Lead-Acid Battery Lithium (LiFePO4) Battery
Maintenance High (regular watering, terminal cleaning) Very Low (virtually none)
Lifespan 4-5 years (up to 8 with excellent care) 5-10 years
Performance Power drops as charge depletes, heavier Consistent power output, lighter, faster acceleration
Charging Slower, sensitive to deep discharges, specific charge cycles Faster, more efficient, can be partially charged
Upfront Cost Lower Higher
Long-Term Value Good with maintenance Excellent (due to lifespan, efficiency, and no maintenance)

Understanding these differences is crucial when choosing a new battery or considering an upgrade for your golf cart. To learn more about various battery types and their specific needs, you can explore resources like our guide on mobility-scooter-battery-replacement.

Professional Service vs. DIY: Making the Right Choice

Deciding whether to tackle your golf cart battery service yourself or call in the professionals depends on several factors, including your comfort level with electrical systems, the tools you have available, and the complexity of the issue.

Benefits of Professional Golf Cart Battery Service

While routine maintenance can be a DIY task, there are times when professional help is invaluable, especially for complex diagnostics or repairs. Our expert technicians at Laurel Phone Repair in Laurel, Hattiesburg, Jackson, and Jones County, Mississippi, offer comprehensive golf cart battery services.

  • Expert Diagnosis: Our technicians have the experience and specialized equipment to accurately diagnose battery issues that might not be obvious. They can perform load testing to assess battery health under real-world conditions, identify failing cells, and pinpoint problems with your charging system.
  • Proper Tools and Equipment: We use professional-grade tools for testing, cleaning, and replacement, ensuring the job is done safely and correctly. This includes accurate torque wrenches, hydrometers, voltmeters, and diagnostic software for lithium systems.
  • Handling Hazardous Materials: Batteries contain corrosive acids and heavy metals. Professionals are trained in the safe handling and disposal of these materials, protecting both you and the environment.
  • Warranty on Service: When you choose professional golf cart battery service, our work is backed by a warranty, giving you peace of mind.
  • Ensuring Correct Installation: Improper installation can lead to immediate battery failure or long-term damage. Our technicians ensure new batteries are installed correctly, all connections are secure, and your charging system is calibrated.

When DIY Maintenance Makes Sense

For the proactive golf cart owner, much of the routine golf cart battery service can be performed at home. This can save you money and keep you more connected to your cart’s health.

  • Routine Watering (Flooded Lead-Acid): As detailed earlier, checking and topping off water levels is a straightforward task that most owners can handle.
  • Terminal Cleaning: Removing corrosion and applying anti-corrosion agents is a simple yet effective maintenance step.
  • Visual Inspections: Regularly checking for cracks, leaks, or frayed cables doesn’t require specialized tools.
  • Tightening Connections: With insulated tools and proper torque specifications, ensuring tight connections is a manageable DIY job.
  • Using a Battery Tender for Storage: For off-season storage, connecting a smart charger or battery tender can keep your batteries conditioned and prevent sulfation.

For those comfortable with basic repairs and maintenance, resources like our guide on scooter-battery-replacement-complete-guide can provide further insights into battery care principles that apply to various electric vehicles.

Choosing and Replacing Your Golf Cart Batteries

Eventually, even the best-maintained batteries will need replacement. Knowing when and how to choose new batteries is critical for your golf cart’s continued performance.

Key Factors for Choosing a New Battery

When it’s time to replace your golf cart batteries, several factors will guide your decision:

  • Voltage (6V, 8V, 12V): Your golf cart’s battery system is designed for a specific total voltage (e.g., 36V or 48V). This is achieved by connecting multiple batteries in series. For example, a 48V system might use six 8-volt batteries or four 12-volt batteries. Always replace with batteries of the correct individual voltage to match your cart’s system.
  • Amp-Hour (Ah) Rating: The Amp-hour rating indicates how much energy the battery can store and deliver over time. A higher Ah rating generally means a longer run time or range for your golf cart. Consider your usage patterns: do you need maximum range, or is shorter, lighter use more common?
  • Battery Chemistry (Lead-Acid, AGM, Lithium):
    • Lead-Acid (Flooded): Most affordable upfront, but requires regular maintenance.
    • AGM/Gel: Sealed, maintenance-free (no watering), but typically more expensive than flooded.
    • Lithium (LiFePO4): Highest upfront cost, but longest lifespan, maintenance-free, lighter, faster charging, and consistent power. This is often the best long-term value.
  • Physical Size and Terminal Type: Batteries must fit securely in your cart’s battery trays and have compatible terminal types for your cables. Measure your existing batteries and note terminal configurations (e.g., automotive post, stud).
  • Brand Reputation: Stick with reputable battery brands known for quality and reliability. Brands like Trojan, US Battery, Exide, and Deka have long been trusted in the golf cart industry.

Understanding the Costs of Golf Cart Battery Service and Replacement

The costs associated with golf cart battery service and replacement can vary widely depending on the type of service, battery chemistry, and whether you opt for DIY or professional help.

  • Cost of a New Battery Set: A complete set of new flooded lead-acid batteries for a typical 36V or 48V golf cart can range from $600 to $1,500. Lithium battery conversion kits, while more expensive upfront, typically start around $1,500 and can go up to $3,000 or more, but offer significant long-term savings due to their lifespan and efficiency.
  • Labor Costs for Professional Installation: If you opt for professional installation, you’ll incur labor charges. This typically includes removing old batteries, cleaning the battery compartment, installing new batteries, and ensuring all connections are correct and torqued to specification.
  • Price of Reconditioned Batteries: Some providers offer reconditioned batteries as a more cost-effective alternative to new ones. These can save money and extend the life of a set, but their lifespan can be less predictable than new batteries. It’s crucial to ensure they come with a warranty and are from a reputable source if considering this option.
  • Long-Term Cost of Lithium vs. Lead-Acid: While lithium batteries have a higher initial price tag, their longer lifespan (5-10 years vs. 4-5 years for lead-acid), lack of maintenance, faster charging, and consistent performance often result in a lower total cost of ownership over the life of your golf cart. You might replace lead-acid batteries two or three times for every one set of lithium batteries.

For those interested in understanding the economics of battery replacement in other electric vehicles, our article on chevy-volt-battery-replacement offers further insights into the costs involved in larger-scale battery systems.

Frequently Asked Questions about Battery Care

Here are some of the most common questions we hear regarding golf cart battery service and maintenance:

How often should I check my golf cart batteries?

For flooded lead-acid batteries, a visual inspection and water level check should be done monthly. In hot climates or with heavy use, you might need to check more frequently. Connections should be checked and tightened every few months. Lithium batteries, on the other hand, require minimal to no regular checks due to their sealed nature and internal Battery Management Systems (BMS).

What kind of water should I use in my batteries?

Only use distilled or deionized water. Tap water contains minerals (like calcium and magnesium) that can build up on the battery plates, reducing capacity, interfering with chemical reactions, and ultimately shortening the battery’s lifespan. Never use acid or tap water to top off your batteries.

Can I replace just one dead battery in a set?

It is generally not recommended to replace just one dead battery in a set, especially if the other batteries are more than a year or two old. When a new battery is introduced to an older set, its capacity will be much higher than the remaining batteries. This creates an imbalance where the new battery works harder and the older batteries may pull down its performance. The new battery will quickly deteriorate to the level of the old ones, and the overall performance of the set will be poor. If more than two or three batteries have failed, we always recommend replacing the entire set to ensure balanced performance and maximum lifespan for your investment.

Conclusion

Regular golf cart battery service is not just a chore; it’s an investment that pays dividends in reliability, performance, and significant cost savings. By understanding the signs of battery trouble, following proper maintenance procedures for your battery type, and making informed decisions about replacements, you can ensure your golf cart runs smoothly for years to come.

Remember the benefits: a longer battery lifespan means less frequent, expensive replacements. Better performance ensures you’re never stranded and always have the power you need. And ultimately, smart maintenance saves you money over the long haul.

For complex diagnostics, professional installation, or when you need expert battery repair that goes beyond DIY capabilities, trust the experienced technicians at Laurel Phone Repair. We’re here to get you back on the course or cruising through your community safely and efficiently. Visit us in Laurel, Hattiesburg, Jackson, or Jones County, Mississippi, for all your golf cart battery needs.

Ghost in the Machine? Troubleshooting and Fixing Common Keyboard Woes

Computer Keyboard Repair: Ultimate Fix 2025

Why Your Keyboard Suddenly Stops Working (And What to Do About It)

Computer keyboard repair is often simpler than you think. Here’s what to try first:

  1. Reboot your computer – This fixes most keyboard issues immediately
  2. Check connections – Ensure USB cables are plugged in or wireless batteries aren’t dead
  3. Test in BIOS/UEFI – If keys work there, it’s a software problem
  4. Clean debris – Use compressed air to remove dust and crumbs
  5. Reinstall drivers – Windows Device Manager can reset keyboard drivers
  6. Check for liquid damage – Spills often cause sticky or dead keys

A broken keyboard is no laughing matter. Whether it’s a single key that stopped responding, an entire section that’s gone dark, or a keyboard that cuts out randomly, these issues can halt your productivity instantly. The good news? Many keyboard problems stem from simple causes like dirty contacts, loose connections, or software glitches that you can fix yourself in minutes.

The research shows that most keyboard failures fall into predictable patterns. A few keys failing in sequence often indicates a problem with the keyboard matrix – the internal grid that registers your key presses. Random failures might point to a loose cable connection. And keys that work in your computer’s BIOS menu but fail in Windows? That’s almost always a driver or settings issue, not hardware failure.

I’m Ralph Harris, and with over 20 years of electronics repair experience and more than 500 Apple repair certifications, I’ve diagnosed and fixed countless keyboard issues – from simple cleaning jobs to complex circuit board repairs requiring specialized soldering equipment. This guide will walk you through everything from basic troubleshooting to knowing when computer keyboard repair requires professional help.

Step-by-step keyboard troubleshooting flowchart showing decision points: Does keyboard have power? → Check USB/batteries. Do keys work in BIOS? → Software issue, reinstall drivers. Is it one key or many? → Clean single keys, replace keyboard if multiple sections fail. Is there visible damage? → Professional repair needed for liquid damage or circuit issues. - computer keyboard repair infographic brainstorm-4-items

First Steps: Diagnosing the Problem

When your keyboard throws a tantrum, the first step is to calmly assess the situation. Often, the solution is much simpler than we anticipate. We’ll start with the easiest fixes and gradually move to more involved diagnostics.

The absolute first thing we recommend is a simple reboot. It might sound cliché, but a “simple reboot can correct a thousand ails,” including many keyboard issues. If your computer is completely unresponsive, you might need to hold down the power button for 10-15 seconds to force a shutdown, then power it back on.

Next, let’s check the connections. For an external keyboard, ensure the USB cable is firmly plugged into your computer. Sometimes, a loose connection is all it takes to disrupt communication. If it’s a wireless keyboard, confirm that the batteries aren’t dead. A lost USB dongle for a wireless keyboard is another common issue, but if the keyboard itself isn’t powering on, fresh batteries are usually the first thing to check.

To help us test the keyboard without relying on its physical keys, we can use an On-Screen Keyboard. This virtual keyboard allows us to type with a mouse, helping us determine if the issue is with the physical keys or something deeper within the system.

Need help diagnosing the issue? Don’t hesitate to visit our experts for quick and accurate Device Diagnostics.

Is It a Hardware or Software Issue?

One of the most crucial steps in computer keyboard repair is determining if the problem is rooted in hardware or software. This distinction guides our troubleshooting path significantly.

A great way to test this is by performing a BIOS/UEFI test. When you first power on your computer, before the operating system loads, you can usually enter the BIOS or UEFI setup menu by pressing a specific key (often F2, Delete, F10, or F12). If your keyboard works perfectly within this menu – meaning you can steer and select options using the problem keys – then we know the issue lies within your operating system (Windows, macOS, etc.), not the physical keyboard itself. If the keys still don’t work in BIOS/UEFI, it’s a strong indicator of a hardware problem.

For Windows users, booting into Safe Mode can also help. Safe Mode loads Windows with only essential drivers and services, which can help determine if a third-party application or driver is causing the conflict. While Safe Mode won’t permanently fix the problem, it helps us narrow down the cause.

If you have an external keyboard, testing it on another computer is a quick way to isolate the problem. If it works on another machine, the issue is with your original computer; if it fails on another machine too, the keyboard itself is the culprit.

Finally, consider the scope of the failure. Is it just one key not working, or is the entire keyboard dead? This helps us differentiate between a localized hardware fault (like a single key switch) and a more systemic issue (like a complete connection failure or a major software bug).

Identifying the Type of Failure

Understanding the pattern of your keyboard’s malfunction can provide valuable clues for effective computer keyboard repair.

  • Specific Key Failure: If only one or two keys are not working, it often points to a physical issue with that particular key switch, or debris lodged underneath.
  • A Section of Keys Not Working: This is a classic sign of a problem within the keyboard’s matrix. Keyboards operate on a grid system, with rows and columns. If keys like ‘minus’, ‘left bracket’, ‘semi-colon’, and ‘Space’ all fail simultaneously, and they follow a pattern on the keyboard layout, it’s highly indicative of a failure in one of the “X and Y axes of that matrix.” This could be a damaged trace on the flexible circuit board inside the keyboard.
  • Intermittent Issues: A keyboard that works sometimes and then stops, or keys that register erratically, often suggests a loose or partially damaged connection. For laptops, “sometimes the keyboard loses connection with the laptop’s motherboard, and you have a keyboard that either works intermittently or not at all.”
  • Complete Keyboard Malfunction: If the entire keyboard is unresponsive, it could be a complete connection failure, a major driver issue, or a more serious hardware problem like a faulty encoder chip.

By carefully noting which keys are affected and whether there’s a pattern, we can often pinpoint the area of concern and guide our troubleshooting efforts more efficiently.

Tackling Software and Settings Glitches

Once we’ve ruled out obvious hardware failures, it’s time to dive into the software side of things. Many keyboard problems aren’t physical at all, but rather stem from driver conflicts, incorrect settings, or even malicious software.

Image of the Windows Device Manager or macOS System Settings keyboard section - computer keyboard repair

Software issues can manifest in various ways: keys typing the wrong characters, keys repeating excessively, or keys being unresponsive despite the hardware being fine. “If none of the above solutions solve the problem, it’s possible that your keyboard is the victim of a virus.” So, a thorough malware scan might be in order if nothing else works.

Reinstalling Keyboard Drivers

Drivers are the essential software that allows your operating system to communicate with your keyboard. If these drivers become corrupted or outdated, your keyboard can stop working correctly.

For Windows users, the process is straightforward:

  1. Open Device Manager: You can typically find this by searching for “Device Manager” in the Windows search bar.
  2. Locate Keyboards: Expand the “Keyboards” section.
  3. Uninstall Driver: Right-click on your keyboard device (it might be listed as “Standard PS/2 Keyboard” or similar) and select “Uninstall device.” Do NOT select “Delete the driver software for this device” unless specifically instructed.
  4. Reboot: Restart your computer. Windows should automatically detect the keyboard and “grab the generic drivers for the keyboard, which may fix the problem.”
  5. Update from Manufacturer: If the issue persists, visit your computer or keyboard manufacturer’s website and download the latest keyboard drivers for your specific model. Install these drivers and reboot again.

For Mac users, uninstalling individual drivers can be tricky. Instead, we recommend:

  1. Software Update: Go to System Settings > General > Software Update and install any available updates. macOS updates often include driver fixes.
  2. SMC, PRAM, or NVRAM Reset: For more persistent issues, you can try resetting your Mac’s System Management Controller (SMC), Parameter RAM (PRAM), or Non-Volatile RAM (NVRAM). The procedure varies by Mac model, so check Apple’s support documentation for the correct steps.

Adjusting Your Keyboard Settings

Sometimes, the keyboard isn’t broken; it’s just configured in a way that makes it seem broken! Windows and macOS offer several accessibility and typing settings that, if misconfigured, can lead to frustrating keyboard behavior.

  • Filter Keys: If your keyboard is behaving strangely, “make sure Filter Keys and Sticky Keys are also turned off.” Filter Keys is an accessibility feature designed to ignore brief or repeated keystrokes, which can make your keyboard seem unresponsive or laggy.
  • Sticky Keys: Another accessibility feature, Sticky Keys allows modifier keys (like Shift, Ctrl, Alt, or Windows key) to remain active until another key is pressed. While helpful for some, it can cause unexpected behavior if accidentally enabled.
  • Repeat Delay Settings: If you find that “pressing a key might type two or more characters” even with a single press, your keyboard’s Repeat Delay setting might be too short. Adjusting this in your keyboard settings (often found under Accessibility or Ease of Access) can resolve unwanted double-typing.
  • Checking and Changing Keyboard Layout: If your keys are typing entirely different characters than what’s printed on them (e.g., you press “A” and get “@”), your keyboard layout or language settings might be incorrect. Ensure your operating system is set to the correct keyboard layout for your region and language.

Hands-On Hardware Fixes: Cleaning and Simple Repairs

Now we move on to the physical aspects of computer keyboard repair. Many issues, especially sticky or unresponsive keys, are due to physical obstructions or minor damage that can be fixed with a bit of elbow grease and the right tools.

“Quality keyboards die because of abuse. A few drops of any beverage with acid in it will surely cause an eventual failure.” Liquid spills, dust, and debris are the arch-nemeses of keyboards. Crumbs, hair, and everyday grime can easily get lodged under keycaps, preventing switches from functioning correctly.

Image of keyboard cleaning tools like compressed air, isopropyl alcohol, and microfiber cloths - computer keyboard repair

The Essential Keyboard Cleaning Guide

A clean keyboard is a happy keyboard. Here’s our essential guide to cleaning your keyboard effectively:

  1. Shut It Down: Always power off and unplug your computer or keyboard before cleaning. Safety first!
  2. Loose Debris: Turn your keyboard upside down and gently shake it to dislodge any large crumbs or debris. Follow up with compressed air, holding the can upright and using short bursts to blow out particles from between the keys. For laptop keyboards, “if you notice something stuck under a certain key, try tilting the laptop to different angles while blowing the compressed air to get it out.”
  3. Grease & Grime: For general cleaning and removing oil and grime, dampen a microfiber cloth with isopropyl alcohol (preferably >90% purity) and gently wipe down the surface of the keycaps and the areas between them. Do not spray liquid directly onto the keyboard.
  4. Cleaning Up Spills & Sticky Keys: If “one or two keys are stuck because of soda spillage, pop the offending key caps off (if possible) and try to clean as much dried liquid from the key switch as possible.” Use a cotton swab lightly dampened with isopropyl alcohol or soapy water to carefully clean the key switch mechanism. For deeply sticky key retainers on laptops, you might need to remove them and soak them in hot, soapy water for about 5 minutes, then dry thoroughly before reinstallation.
  5. Popping Off Keycaps: Be extremely careful when removing keycaps. “Key caps are held on by tiny fragile clips. Be careful as you pry up any keys.” Use a keycap puller or a small, flat prying tool. For Apple’s “butterfly” keyboards (found on some 2015+ MacBooks and 2016+ MacBook Pros), “we don’t recommend attempting to remove keys from your keyboard” due to their extreme fragility. If you have one of these, consult Apple’s Keyboard Service Program.

For more detailed instructions, especially for laptop keyboards, consult a comprehensive Laptop Keyboard Cleaning Guide.

Basic DIY computer keyboard repair

Beyond cleaning, some minor hardware repairs are possible at home, provided you have the right tools and a steady hand.

Necessary Tools: For most keyboard disassembly, you’ll need “a small Phillips screwdriver. Some, such as this one, may also need a tiny Allen or Torx driver.” An Ohm Meter or Multimeter can be invaluable for testing continuity, and an On-Screen Keyboard helps with live testing. For prying, a thin plastic tool (like a guitar pick or specific electronics opening tool) is useful. Cotton swabs and isopropyl alcohol are also staples.

Removing Keycaps Safely: As mentioned, proceed with caution. Once a keycap is off, you can inspect the switch underneath for damage or debris. Sometimes, a broken keycap or its stabilizer can be replaced.

Checking and Reseating Internal Ribbon Cables on Laptops: If your laptop keyboard is working “intermittently or not at all,” it might be due to a loose ribbon cable connection to the motherboard. This is a more involved repair as it requires disassembling part of your laptop. If you’re comfortable opening your laptop, locate the keyboard’s ribbon cable and gently disconnect and reconnect it to ensure it’s seated properly. Be extremely careful not to tear the delicate ribbon.

Advanced Computer Keyboard Repair and When to Call a Pro

When simple cleaning and software tweaks don’t cut it, we enter the field of more advanced computer keyboard repair. This often involves delving into the keyboard’s internal circuitry, a task that requires specialized tools, a good understanding of electronics, and a lot of patience.

Signs of permanent hardware failure include widespread key malfunction without a clear software cause, or visible damage to the circuit board. If a significant section of keys is dead in a pattern, it points to the keyboard matrix. If nothing works, it could be the encoder chip. This is where “the more advanced repair techniques for keyboard circuitry” come into play.

Laptop vs. External computer keyboard repair

The approach to computer keyboard repair differs significantly between integrated laptop keyboards and external keyboards.

  • External Keyboards: These are generally easier to disassemble and access the internal components. You can usually separate the keycaps, the flexible membrane sheets (the “matrix” with X and Y axes), and the encoder board. This allows for detailed inspection and repair of damaged traces using conductive ink or for replacing faulty components. An example repair showed “33 screws on the metal plate” of a typical keyboard, and warned to “take great care” when lifting the matrix sheets to avoid disturbing the tiny flexible caps at each key position.
  • Integrated Laptop Keyboards: Repairing a laptop keyboard is often more complex and can be expensive. The keyboard is frequently integrated into the laptop’s top case, meaning replacing it often involves replacing a large portion of the chassis. These are not designed for easy DIY repair. “If an extensive section of the keyboard is stuck because of liquid damage, like a spilled cup of soda or coffee, your best recourse may be to have the keyboard assembly replaced” rather than attempting to repair individual keys. Special caution is needed for models like Apple’s “butterfly” keyboards, which were “particularly fragile and difficult to remove intact,” leading to a class-action lawsuit settlement.

When to Consider Professional Repair or Replacement

While some DIY fixes are possible, there comes a point when a user should consider professional computer keyboard repair or even full replacement.

  • Extensive Liquid Damage: If a large amount of liquid, especially acidic beverages, has seeped into the keyboard, it can cause widespread corrosion and damage to the delicate circuitry. While you might clean individual sticky keys, “if an extensive section of the keyboard is stuck because of liquid damage… your best recourse may be to have the keyboard assembly replaced.”
  • Swollen Laptop Battery: In laptops, “if your laptop battery becomes swollen, for instance, it can push on other parts and prevent them from working properly,” including the keyboard. A swollen battery is a serious safety hazard and requires immediate professional attention.
  • Failed Encoder Chip: This is the brain of your keyboard, converting key presses into signals the computer understands. If “the bad keys did not appear while testing either connector than the Encoder chip is bad,” it’s a complex component to replace, often requiring micro-soldering skills and specialized equipment.
  • Broken Traces on the Circuit Board: While a single broken trace might be fixable with conductive ink by an experienced DIYer, extensive or hidden damage requires professional diagnostics. One repair case involved a “21Mhz pixel clock” trace damaged by a leaking battery that was “totally invisible” and required careful tracing and a “short jumper later” to fix.
  • Cost vs. Benefit Analysis: Sometimes, the cost and effort of a complex repair outweigh the price of a new keyboard. Especially for older, less expensive external keyboards, replacement might be the more practical choice. For integrated laptop keyboards, however, replacement can be costly, making professional repair a viable option if it’s less than a new laptop.

If you’re still under warranty, it’s always worth checking with your laptop manufacturer’s tech support line before attempting any repairs yourself. For everything else, that’s where we come in. Our skilled technicians in Laurel, Hattiesburg, Jackson, and Jones County, Mississippi, are equipped to handle complex computer keyboard repair issues.

Conclusion

We’ve covered a lot of ground in our journey through computer keyboard repair, from simple reboots to intricate circuit board diagnostics. Many keyboard woes can be resolved with basic troubleshooting steps like checking connections, rebooting your system, or a thorough cleaning. Software issues, such as corrupted drivers or misconfigured settings, are also common culprits and often have straightforward solutions.

However, some problems, particularly those involving extensive liquid damage, internal hardware failures like a faulty encoder chip, or delicate integrated laptop keyboards, demand a more expert touch. It’s crucial to know your limits and when to seek professional help to avoid further damage to your device. Always prioritize safety when dealing with electronics, especially when opening up devices.

At Laurel Phone Repair, our experienced technicians specialize in quick, affordable, and high-quality repairs for phones, tablets, and computers. We’re here to help you with everything from simple diagnostics to complex component-level repairs. Don’t let a faulty keyboard slow you down – our team in Laurel, Hattiesburg, Jackson, and Jones County, Mississippi, is ready to get your device back in top shape.

Get professional computer repair services and let us take care of your keyboard woes, so you can get back to typing away with ease!

5 Do’s and Don’ts for Phone Repair Estimates

Phone repair estimates: 5 Smart Do’s & Don’ts

Why Getting an Accurate Phone Repair Estimate Matters

Phone repair estimates are the crucial first step to fixing your broken device without breaking your bank. When your phone screen cracks or your battery dies, knowing what to expect financially helps you make smart decisions about repair versus replacement.

Quick Answer: What You Need to Know About Phone Repair Estimates

  • Average costs vary widely: Screen repairs range from $50-$329, battery replacements from $34-$134+, and charging port fixes from $20-$90
  • Get specific information ready: Your exact phone model, detailed problem description, and damage history help shops give accurate quotes
  • In-person beats online: While online estimators provide ballpark figures in under 2 minutes, physical inspection reveals hidden issues like frame damage or water corrosion
  • Watch for additional costs: Some shops charge diagnostic fees (often waived if you proceed with repair), and final costs may increase if technicians find additional damage
  • Compare your options: Check if you have warranty coverage, understand part quality differences (OEM vs. aftermarket), and ask about repair guarantees

Understanding what influences your estimate helps you avoid surprises and choose the right repair option. Device age, damage extent, part quality, and technician expertise all play significant roles in your final cost.

Most repair shops offer free diagnostics, and reputable providers will explain their findings before proceeding with any work. The estimate validity period typically lasts 7-30 days, though this varies by shop.

I’m Ralph Harris, and with over 20 years of experience in electronics repair and more than 500 Apple repair certifications, I’ve personally provided thousands of phone repair estimates and understand exactly what factors drive repair costs. Let me walk you through the essential do’s and don’ts that will help you get accurate estimates and make informed repair decisions.

infographic showing 5 Do's and Don'ts for phone repair estimates including understanding cost factors, avoiding online-only estimates, providing detailed information, reading warranty terms, and comparing repair options - Phone repair estimates infographic

DO: Understand What Influences Repair Costs

When your phone takes an unexpected tumble or starts acting sluggish, the first thought might be, “How much is this going to cost me?” The truth is, there’s no one-size-fits-all answer. The cost of a phone repair is a dynamic figure, influenced by a variety of factors that we carefully assess to provide you with a fair and accurate phone repair estimate.

various phone components like a screen, battery, and charging port - Phone repair estimates

From the moment you walk through our doors in Laurel, Hattiesburg, Jackson, or Jones County, Mississippi, our experienced technicians begin evaluating these elements. Understanding them is key to making an informed decision about your repair. You can learn more about how we determine pricing on our Pricing page.

Key Factors That Affect Your Estimate

Our goal is always to bring your device back to life efficiently and affordably. Here’s a breakdown of what goes into your phone repair estimate:

  • Phone Brand and Model: This is often the biggest factor. A repair for a brand-new flagship smartphone, like the latest iPhone or Samsung Galaxy, will almost always be more expensive than for an older model or a less common brand. This is primarily due to the cost and availability of replacement parts. Newer models often use more advanced, proprietary components that are pricier to source.
  • Type of Damage: Not all damage is created equal. A simple software glitch might be a quick fix, but a shattered screen, a faulty charging port, or extensive water damage requires more intensive labor and costly parts.
    • Screen Repair Costs: A cracked phone screen is one of the most common issues we see. The average cost to repair a cracked phone screen can range from $50 to $329. This wide range reflects the difference between replacing an LCD on an older, more basic model versus a high-resolution OLED display on a premium smartphone.
    • Battery Replacement Costs: If your phone isn’t holding a charge like it used to, a new battery can breathe new life into it. iPhone battery replacement starts from $34, but costs can range up to $134 or more depending on the model and whether it’s an official service. The cost typically depends on the device model and the battery’s accessibility.
    • Charging Port Repair Costs: When your phone refuses to charge, a damaged charging port might be the culprit. Cell phone charging port repair costs can range from $20 to $90. This is often a less expensive repair than a screen, but still crucial for your phone’s functionality.
  • Extent of Damage: A small crack in the corner of a screen might only require the glass to be replaced, while a completely shattered screen with underlying display issues will need a full screen assembly replacement. Similarly, water damage can range from a minor spill that only affects a few components to a complete submersion that causes widespread corrosion and multiple part failures.
  • Technician Expertise: We pride ourselves on having experienced technicians who are experts in their field. Their skill ensures that the repair is done correctly the first time, preventing further issues and saving you money in the long run. Highly trained technicians, especially those with specialized certifications, contribute to the quality and reliability of the repair, and this expertise is reflected in the overall service.

Why Part Quality Matters

When it comes to replacement parts, you generally have two main options: Original Equipment Manufacturer (OEM) parts or aftermarket parts. Understanding the difference is crucial for your phone repair estimate and the longevity of your device.

  • OEM Parts: These are parts made by the original manufacturer of your phone (e.g., Apple, Samsung). They are designed to exact specifications, ensuring perfect fit, functionality, and performance. Using OEM parts often means your phone will feel and function exactly as it did before the damage, and they typically come with a manufacturer’s warranty. However, they are usually more expensive.
  • Aftermarket Parts: These are parts manufactured by third-party companies. While some high-quality aftermarket parts can perform nearly as well as OEM, others might be of lower quality. They are generally more affordable, which can significantly reduce your repair cost. However, there can be performance differences, such as color accuracy or touch sensitivity on a screen, and they might not be as durable. In some cases, using non-OEM parts on iPhones, for example, can even trigger an “important display message” notification due to proprietary licensing and software.

At Laurel Phone Repair, we believe in transparent part options. We’ll discuss the pros and cons of both OEM and high-quality aftermarket parts with you, helping you choose the best option for your budget and needs. Our goal is to ensure you understand how your choice impacts the repair’s cost, performance, and any warranty implications. We stand behind our work, offering warranties on our repairs regardless of the part type chosen, ensuring your peace of mind. Find out more about our services, including part options, on our Phone Repair Services in Laurel page.

DON’T: Rely Solely on Online Estimators

It’s tempting to type your phone model and problem into an online estimator and expect a definitive answer. While these tools can be incredibly fast and provide a convenient ballpark figure, relying solely on them for your phone repair estimate can lead to surprises down the road. An online estimator might give you a price in “6 easy steps” and “less than 2 minutes,” but it can’t see the full picture.

The Difference Between an Online Estimate and an In-Person Quote

Think of an online estimate tool as a helpful starting point, but not the finish line.

  • Online Estimate (Ballpark Figure): These tools typically ask for your phone model and the most obvious issue (e.g., “cracked screen,” “battery not holding charge”). They then pull up a generalized price range based on common repairs. This is useful for getting a quick idea of potential costs and comparing services at a high level. However, they are often limited by the information you can provide.
  • In-Person Quote (Firm Assessment): This is where our expertise truly shines. When you bring your device to us for a free, no-obligation diagnostic, our certified technicians can perform a comprehensive inspection. This involves physically examining your phone, potentially disassembling it, and using specialized tools to uncover hidden issues that an online form simply can’t detect.

Accuracy Limitations and Unforeseen Issues:

An online tool can’t account for complex problems. For example, if your screen is cracked, an online estimator might quote you for a screen replacement. But what if the fall also damaged the phone’s frame, or worse, the internal components? A damaged frame, for instance, can prevent a new screen from seating properly, leading to further issues. A physical inspection allows us to identify these “unforeseen issues” and provide a truly accurate phone repair estimate.

When to Get an In-Person Inspection

While online tools have their place, certain scenarios absolutely warrant an in-person diagnostic to ensure you get the most accurate phone repair estimate possible:

  • Complex Issues: If your phone is experiencing multiple problems, or if the issue isn’t immediately obvious (e.g., intermittent freezing, unusual sounds, camera not focusing), a hands-on diagnostic is essential. These symptoms could point to anything from a software glitch to a failing motherboard.
  • Water Damage: This is perhaps the most critical scenario for an in-person inspection. Water-damaged phone repair costs can range from as little as $30 to well over $100, but the true cost depends entirely on the extent of internal corrosion. An online tool can’t tell you if the water has fried your logic board or just caused a minor short. We need to open the device, clean it, and assess the damage to provide a realistic estimate. Taking water-damaged phones to a repair professional immediately is crucial to prevent further corrosion.
  • Phone Not Turning On: A dead phone could be due to a completely depleted battery, a faulty charging port, a damaged power button, or a critical internal failure. Our free diagnostic will help pinpoint the exact cause.
  • Multiple Problems: If your phone has a cracked screen and a battery that drains quickly and the speaker isn’t working, an in-person inspection allows us to diagnose all issues simultaneously and provide a bundled phone repair estimate, potentially saving you money compared to addressing each problem separately.
  • Intermittent Faults: If your phone works sometimes but not others, or if a feature randomly stops functioning, these “ghost in the machine” problems are notoriously difficult to diagnose without a technician’s direct examination and testing.

We offer free, no-obligation diagnostics on all devices. Our professional technicians will help you determine the repair needed and the best price for it. Don’t guess – let us take a look. Get a professional Device Diagnostics with us.

DO: Provide Detailed Information for Accurate Phone Repair Estimates

Imagine trying to fix a car without knowing its make, model, or what sound it’s making. You wouldn’t get very far, right? The same applies to your phone. The more detailed information you can provide, the more accurate and efficient your phone repair estimate will be. It helps us understand the problem, anticipate potential complications, and prepare the right parts and tools.

customer talking to a repair technician at a counter - Phone repair estimates

When you come to us at Laurel Phone Repair, our friendly staff will guide you through this process. Providing comprehensive details ensures we can give you the most precise quote and get your repair underway swiftly. You can even start by scheduling your repair with us online on our Schedule Your Repair page.

What Information to Give the Repair Shop

When discussing your phone’s issues with our technicians, here’s a list of crucial information that will help us provide the most accurate phone repair estimate:

  • Exact Phone Model (e.g., iPhone 14 Pro, Samsung Galaxy S23): This is paramount. Even small variations between “iPhone 13” and “iPhone 13 Pro” can mean different parts, different costs, and different repair procedures. Knowing the exact model helps us quickly identify compatible components.
  • Detailed Description of the Issue: Don’t just say “it’s broken.” Tell us: “The screen is cracked, and there are black lines running through the display,” or “The phone charges slowly and only if I hold the cable at a specific angle,” or “My phone turns off randomly even when the battery percentage is high.” The more specific, the better.
  • When the Problem Started: Did it happen suddenly after an event, or has it been a gradual decline? This can offer clues about the nature of the damage (e.g., impact vs. wear and tear).
  • Any Recent Accidents (Drops, Water Exposure): Be honest! Even if you think a drop wasn’t severe or a splash quickly dried, it could be the root cause of your current problem. Water damage, especially, can manifest days or weeks after exposure. Knowing about an accident helps us look for specific types of damage.
  • If You Have a Warranty or Protection Plan: This is vital for determining your out-of-pocket costs. If you have a manufacturer’s warranty, AppleCare+, or a third-party protection plan (like Asurion), your repair might be covered, or you might only owe a deductible. We can help you steer these options.

Getting an Accurate Estimate for Complex Issues

Some phone issues aren’t as straightforward as a cracked screen. For these more complex problems, providing detailed information, combined with our expert diagnostics, is absolutely essential for an accurate phone repair estimate.

  • Water Damage Diagnosis: As mentioned, water damage is tricky. Knowing when and how your phone was exposed can help us prioritize our diagnostic approach. Our technicians will perform a complete water-damage diagnostic to assess the extent of corrosion and identify all affected components. This initial assessment is critical because corrosion can set in quickly and cause secondary failures.
  • Motherboard Issues: If your phone isn’t turning on, has severe performance issues, or exhibits strange behavior, it might be a problem with the logic board (motherboard). These repairs are highly specialized and often involve micro-soldering. Providing a thorough history of the phone’s symptoms and any events leading up to the failure helps our technicians narrow down the potential issues on the board.
  • Data Recovery Needs: If your phone is severely damaged and your primary concern is recovering precious photos or contacts, our diagnostic process will focus on assessing the feasibility and cost of data recovery alongside potential device repair. It’s a different skillset and often a separate service.
  • Why a Diagnostic is Essential: For complex issues, a diagnostic isn’t just recommended; it’s a necessity. We use advanced diagnostic tools to identify and fix problems quickly. Our free diagnostic service means you’ll know exactly what’s wrong and what it will cost before we proceed with any repair. This transparency ensures there are no surprises in your final phone repair estimate. Learn more about our comprehensive offerings on our Services page.

DON’T: Ignore the Fine Print and Warranty Details

Getting a phone repair estimate is just the first step. To truly protect yourself and avoid unexpected costs, it’s crucial to pay close attention to the fine print, understand the shop’s policies, and clarify all warranty details. Skimming these details can lead to frustration and additional expenses.

At Laurel Phone Repair, we believe in complete transparency. We want you to feel confident and informed throughout the entire repair process. We’re always happy to walk you through our terms and conditions. For more detailed information, please visit our Warranty Information page.

Understanding Potential Additional Costs

While we strive to provide accurate upfront estimates, sometimes additional costs can arise. Here’s what to look out for:

  • Hidden Fees: Reputable repair shops will be upfront about all charges. Be wary of estimates that seem too low, as they might have hidden fees tacked on later. Always ask for a breakdown of costs, including parts, labor, and any potential surcharges.
  • Diagnostic Charges (Sometimes Waived): While many shops, including ours, offer free diagnostics, some might charge a small fee, especially for advanced diagnostics on very complex issues. Often, this diagnostic fee is waived or applied toward the repair cost if you decide to proceed with the service. Always clarify this before the diagnostic begins.
  • Additional Damage Found During Repair: It’s not uncommon for technicians to find secondary damage once they open up a device. For example, a cracked screen might hide a bent frame, or a battery replacement might reveal a corroded charging port. If additional damage is found, a trustworthy shop will always contact you, explain the new findings, and get your explicit approval before performing any additional work that would alter your original phone repair estimate.
  • Tax and Service Fees: Your estimate might not always include local sales tax or specific service fees. Always confirm if the quoted price is the “out-the-door” final cost.

What to Do if the Final Cost is Higher Than the Estimate

It’s a frustrating situation to be told one price and then presented with a higher bill. If the final repair cost differs significantly from your initial phone repair estimate, here’s what you should do:

  1. Ask for a Detailed Explanation: Don’t hesitate to ask why the cost increased. A reputable shop will be able to clearly explain what additional work was performed, what extra parts were needed, and why these weren’t identified during the initial estimate.
  2. Request to See the Damaged Parts: If new parts were replaced due to previously hidden damage, ask to see the old, damaged components. This provides tangible proof of the necessity of the additional work.
  3. Approve All Additional Work Beforehand: A crucial best practice is to ensure that the repair shop has a policy to contact you for approval if any additional work beyond the original phone repair estimate is required. Never authorize a repair shop to proceed with additional work without your explicit consent and a clear understanding of the new cost.
  4. Understanding Repair Terms and Conditions: Before any repair, take a moment to read and understand the shop’s terms and conditions, especially regarding price changes and approvals. This helps manage expectations and protects you from unexpected charges.

DO: Compare Your Options and Understand the Guarantee

When your phone needs fixing, it’s natural to want the best service at a fair price. Just as you wouldn’t buy the first car you see, you shouldn’t necessarily jump on the first phone repair estimate you receive. Taking the time to compare your options and understand the guarantees offered can save you money and ensure a quality repair.

At Laurel Phone Repair, we encourage you to compare because we’re confident in our experienced technicians, transparent part options (OEM vs. aftermarket), and high customer satisfaction backed by strong warranties. We’re proud of the certified repairs we offer.

How do phone repair estimates differ between providers?

Different repair services operate with different business models, part sourcing, and technician expertise, all of which influence their phone repair estimates.

  • Cost and Speed: Some shops might offer lower prices but use cheaper, lower-quality aftermarket parts, or have longer turnaround times. Others might charge more but guarantee OEM parts and same-day service. We strive for a balance of affordability, quality, and speed. For instance, many common repairs like screen or battery replacements can often be done in under two hours, sometimes even faster for iPhone display repairs starting from $39.00 or iPhone battery replacements starting from $134.00, with $0 labor fees.
  • Part Sourcing: As discussed, the choice between OEM and aftermarket parts significantly impacts cost. Some providers might exclusively use OEM parts (often authorized service centers), while others offer a choice. We believe in transparency and discussing both options with you.
  • Technician Expertise: The skill and certification of the technicians vary. Our team consists of experienced technicians who are continuously trained and certified, ensuring a high standard of repair, regardless of the device. This expertise is a cornerstone of our service in Laurel, Hattiesburg, Jackson, and Jones County.
  • Warranty and Guarantees: A key differentiator is the warranty offered on repairs. A strong warranty demonstrates a shop’s confidence in their work. We offer robust warranties on our repairs because we stand behind our craftsmanship and the quality of our parts. Learn more about our commitment to quality on our Device Repair with Warranty page.

How do warranty and repair plans affect your phone repair estimates?

Your existing warranty or repair plan can dramatically alter your out-of-pocket costs for a phone repair.

  • Manufacturer Warranty: Most new phones come with a limited manufacturer’s warranty, typically covering manufacturing defects for one year. However, this usually does not cover accidental damage (like a cracked screen or water damage) or wear and tear (like a degrading battery). If your issue is a manufacturing defect, your repair might be free.
  • Protection Plans (e.g., AppleCare+, Carrier Plans, Asurion): These plans are designed to cover accidental damage and often extend warranty coverage.
    • AppleCare+: For iPhones, AppleCare+ covers accidental damage from handling for a service fee per incident. For example, if your iPhone battery holds less than 80% of its original capacity, AppleCare+ can provide a replacement at no additional cost. Screen repairs are also eligible for coverage under AppleCare+ with a service fee. These plans can significantly reduce the cost of major repairs.
    • Third-Party Protection Plans: Many carriers and retailers offer their own protection plans, often backed by companies like Asurion. These plans typically involve a monthly premium and a deductible for each repair claim. If you have such a plan, always start a claim with your provider first, as they might direct you to an authorized repair center or cover a significant portion of the cost.
  • Deductibles and Service Fees: Even with a protection plan, you’ll likely still pay a deductible or service fee per incident. This is your out-of-pocket cost, and factor this into your overall phone repair estimate comparison. Sometimes, a third-party repair shop might offer a repair cost that is lower than your plan’s deductible, making it a more economical choice.
  • Out-of-Pocket Costs: If you don’t have a warranty or protection plan that covers your specific damage, you’ll be paying the full cost out of pocket. This is when comparing phone repair estimates from various reputable shops, like Laurel Phone Repair, becomes even more critical.

Frequently Asked Questions about Phone Repair Estimates

We understand you have questions when your phone breaks. Here are some of the most common inquiries we receive regarding phone repair estimates.

How much does a typical phone screen repair cost?

The cost of a typical phone screen repair can vary quite a bit, generally ranging from $50 to $329. This wide range is primarily due to:

  • Phone Model: Repairing a screen on an older, more basic smartphone will be on the lower end of the spectrum, while replacing the advanced OLED display on a newer flagship model (like the latest iPhone or Samsung Galaxy) will be significantly more expensive. For instance, iPhone display repair costs can start from $79.
  • Part Quality: Your choice between an OEM part and a high-quality aftermarket part will also affect the price. Aftermarket options are often more affordable.
  • Extent of Damage: If only the glass is cracked, it might be cheaper than if the underlying display (LCD/OLED) is also damaged, requiring a full screen assembly replacement.

We always provide a clear phone repair estimate after a diagnostic. You can get more information about our screen replacement services on our Screen Replacement Nearby page.

Are free phone repair estimates always free?

Yes, at Laurel Phone Repair, our initial phone repair estimates and diagnostics are always free. We believe you should know exactly what’s wrong with your device and how much it will cost to fix before committing to anything.

However, it’s worth clarifying with any repair shop you visit:

  • Free Estimates vs. Diagnostic Fees: Some shops might offer a “free estimate” which is simply a quick visual inspection. For more complex issues, they might charge a “diagnostic fee” to fully troubleshoot the problem (e.g., for water damage or a phone that won’t turn on).
  • When a Fee Might Apply: If a diagnostic fee is charged, it’s often for advanced diagnostics that require significant technician time or specialized equipment.
  • Fee Applied to Repair Cost: Many reputable shops that charge a diagnostic fee will apply that fee toward the cost of the repair if you choose to proceed with their service. Always ask about this policy upfront.

Can I get a repair estimate for a water-damaged phone?

Yes, absolutely! We regularly provide phone repair estimates for water-damaged phones. However, it’s important to understand the process:

  • Initial Inspection: We’ll start with an initial visual inspection and gather information about how the water damage occurred.
  • Diagnostic Process for Liquid Damage: Unlike a simple screen repair, water damage requires a thorough diagnostic. We need to open the device, carefully clean any corrosion, and then test each component to determine what is salvageable and what needs replacement. This process is crucial because corrosion can spread and cause secondary failures if not addressed promptly.
  • Corrosion Risk: The longer a water-damaged phone sits, especially if it’s still powered on, the more severe the corrosion can become. This can lead to increased repair costs or even render the phone irreparable.
  • Why Immediate Service is Crucial: Bringing your water-damaged phone to us as soon as possible significantly increases the chances of a successful and more affordable repair. We’ll provide a detailed phone repair estimate after our diagnostic, outlining the necessary repairs and their costs.

Conclusion

Navigating phone repairs can feel daunting, but with the right knowledge, getting an accurate phone repair estimate becomes a straightforward process. By following our “Do’s and Don’ts,” you empower yourself to make smart, informed decisions about your device.

Remember to DO understand what influences repair costs, from your phone’s model to part quality, and DON’T rely solely on quick online estimators when hidden damage could be lurking. Always DO provide detailed information to your repair technician, as your insights are invaluable. Equally important, DON’T ignore the fine print and warranty details; understanding potential extra costs and guarantees protects your wallet. Finally, DO compare your options and comprehend how warranties and repair plans affect your final bill.

At Laurel Phone Repair, serving Laurel, Hattiesburg, Jackson, and Jones County, Mississippi, we pride ourselves on transparency, expertise, and customer satisfaction. We aim to provide clear, reliable phone repair estimates every time, ensuring you know exactly what to expect. We’re here to help you get your device back to peak performance without any unwelcome surprises.

For a reliable estimate and expert service, visit us today or get started with a quote for your Screen Repair.

Mobility Scooter Battery Blues? Upgrade Your Ride with These Top Replacements!

Mobility Scooter Battery Replacement: Top 3 Upgrades

Why Your Mobility Scooter Battery Matters More Than You Think

Mobility scooter battery replacement is essential when your scooter loses range, takes longer to charge, or won’t hold a charge anymore. Here’s what you need to know right away:

Quick Answer: How to Replace Your Mobility Scooter Battery

  1. Identify your battery type – Most scooters use 12V SLA/AGM batteries (often in pairs for 24V systems)
  2. Match the specs – Check voltage (12V, 24V), capacity (12Ah-35Ah typical), and physical size
  3. Choose your chemistry – SLA/AGM batteries cost $50-150 per pair; Lithium batteries cost more ($200-400) but last 4-5x longer
  4. Replace in pairs – Always change both batteries together, never mix old and new
  5. Recycle properly – Take old batteries to a recycling center or battery retailer

Average battery lifespan: 1-2 years for SLA/AGM (300-500 cycles), 3-5 years for Lithium (2,000-3,000+ cycles)

Your mobility scooter is your lifeline to independence. Whether you’re heading to the market, visiting neighbors, or attending family gatherings, a failing battery can stop you in your tracks. The good news? Replacing your mobility scooter battery is straightforward, and choosing the right replacement can actually improve your scooter’s performance.

Most scooters use either traditional Sealed Lead-Acid (SLA) batteries or modern Lithium-ion batteries. SLA batteries are affordable and reliable, typically costing $50-150 for a pair, but they’re heavy and last only 300-500 charge cycles. Lithium batteries cost more upfront ($200-400+) but weigh half as much, charge faster, and can last through 2,000-3000+ cycles—that’s 4-5 times longer than traditional batteries.

The replacement process itself is manageable for most users. You’ll need to match your current battery’s voltage (usually 12V), capacity (measured in Amp-hours or Ah), and physical size. Most mobility scooters use two 12V batteries wired together for 24V total power. Small scooters typically use 12Ah-18Ah batteries, mid-size models need 20Ah-35Ah, and heavy-duty scooters may require 50Ah or larger.

I’m Ralph Harris, and with over 20 years of experience in electronics repair, I’ve helped countless customers restore their mobility through proper mobility scooter battery replacement and maintenance. Understanding the right battery choice can transform your scooter’s reliability and your daily independence.

Infographic showing the top 5 signs your mobility scooter battery needs replacement: 1) Reduced travel range even after full charge, 2) Slower acceleration and decreased top speed, 3) Takes significantly longer to fully charge (beyond normal 6-8 hours), 4) Battery gauge shows inconsistent or rapidly declining charge levels, 5) Physical signs like swelling, cracks, leaking, or corrosion on terminals - mobility scooter battery replacement infographic

Signs It’s Time for a New Battery

Nobody wants to be stranded with a dead battery. Recognizing the warning signs early can save you a lot of hassle and ensure your mobility scooter remains a reliable companion. Here at Laurel Phone Repair, we’ve seen countless scooters come through our doors in Laurel, Hattiesburg, Jackson, and Jones County, Mississippi, and we can tell you that most battery issues present with clear indicators.

Here are the key signs that your mobility scooter battery needs a mobility scooter battery replacement:

  • Reduced Travel Range: This is often the first and most noticeable sign. If your scooter used to take you on long errands but now struggles to make it a few blocks, even after a full charge, your battery’s capacity has likely diminished. The amount of time your scooter runs is decreasing, and that’s a tell-tale sign.
  • Slower Acceleration and Speed: Does your scooter feel sluggish? Is it taking longer to reach its top speed, or does it slow down significantly on inclines that it used to handle with ease? A weakening battery struggles to deliver consistent power, making your ride less responsive and slower.
  • Takes Too Long to Fully Charge: While charging times vary, if your battery is taking significantly longer than its usual 6-10 hours to reach a full charge, or worse, never seems to reach 100%, it’s losing its ability to accept and hold a charge efficiently. Conversely, if it charges very quickly but then dies just as fast, that’s another red flag.
  • Battery Gauge is Unreliable: An inconsistent or rapidly declining battery gauge reading, even after a supposed full charge, indicates that the battery isn’t holding power as it should. It might show full, then drop to half capacity very quickly, or fluctuate wildly.
  • Physical Swelling or Leaking: Always inspect your batteries for any physical signs of distress. Swelling, bulging, cracks in the casing, or any visible leakage around the terminals are serious indicators of battery failure and potential safety hazards. If you notice corrosion on the terminals, it could also point to a leak or poor connection.
  • Battery is Over 1-2 Years Old: Even with the best care, batteries have a finite lifespan. For traditional SLA/AGM batteries, this is typically 1-2 years or 300-500 charge cycles. If your batteries are within this age range and you’re experiencing any of the above symptoms, it’s definitely time to consider a mobility scooter battery replacement. Newer lithium batteries can last 3-5 years or more, but they too will eventually show wear.

If your scooter seems sluggish, doesn’t start efficiently after a full charge, or shuts down abruptly, it’s time to act. Don’t let a failing battery limit your independence.

a person looking at a mobility scooter's battery indicator showing low power - mobility scooter battery replacement

Understanding Your Battery Options: SLA, AGM, and Lithium

When it comes to mobility scooter battery replacement, you’ll primarily encounter two main types: traditional lead-acid variants (SLA/AGM/Gel) and modern lithium-ion batteries. Each has its own set of advantages and disadvantages, and understanding them is crucial for making the best choice for your scooter and lifestyle.

Sealed Lead-Acid (SLA) and Absorbent Glass Mat (AGM) Batteries

These are the workhorses of the mobility scooter world, and for good reason. Most mobility scooters, especially older models or those designed for affordability, come equipped with Sealed Lead-Acid (SLA) batteries. Within the SLA category, you’ll most commonly find Absorbent Glass Mat (AGM) batteries, and sometimes Gel Cell batteries.

Advantages:

  • Most Common Type: They are widely available and compatible with the majority of mobility scooters.
  • Affordable: Generally, SLA and AGM batteries are significantly less expensive upfront than lithium-ion options, typically costing between $50-$150 for a pair.
  • Reliable for Standard Use: They provide consistent power output for typical daily use.
  • Maintenance-Free: As “sealed” units, they don’t require adding water like older flooded lead-acid batteries. They are delivered charged, sealed, and ready to install.
  • Approved for Air Travel: Many AGM batteries comply with IATA/ICAO regulations for transport over land, sea, or air without removal from the chair, making them a good choice for travelers. Interstate Batteries, for example, highlights their compliance with these regulations.

Disadvantages:

  • Heavier Weight: SLA/AGM batteries are considerably heavier than their lithium counterparts. This can impact the overall weight of your scooter and potentially reduce its portability.
  • Shorter Lifespan: On average, SLA and lead-acid batteries have a lifespan of about 300-500 recharge cycles, which translates to roughly 1-2 years of regular use.
  • Requires Regular Maintenance (Charging Habits): While physically maintenance-free, their lifespan is highly dependent on good charging habits. They need to be charged fully after every use and should not be left discharged for extended periods. They also take longer to charge, typically 6-10 hours.

Lithium-Ion (Li-ion) Batteries: The Modern Upgrade

Lithium-ion batteries, particularly Lithium Iron Phosphate (LiFePO4) technology, represent a significant advancement in mobility scooter power. While they might have a higher initial cost, their long-term benefits are compelling.

Advantages:

  • Lighter Weight: Lithium batteries are often half the weight of comparable SLA batteries, making your scooter lighter and easier to transport, especially for foldable models.
  • Longer Lifespan: This is where lithium truly shines. They boast a lifespan of 2,000-3,000+ recharge cycles, which is 4-5 times longer than SLA/AGM batteries. This often translates to 3-5 years or more of use. Dakota Lithium, for instance, touts 2,000-3,000 cycles for their batteries.
  • Faster Charging: Lithium batteries typically charge much faster, often taking only 2-4 hours to reach full capacity.
  • Increased Scooter Range and Performance: Thanks to their stable voltage output and higher energy density, lithium batteries can provide twice the run time for your mobility scooter compared to older batteries, leading to greater range and more consistent performance throughout the discharge cycle.
  • Maintenance-Free: Similar to sealed lead-acid, lithium batteries require no physical maintenance. They often include a built-in Battery Management System (BMS) that protects against overcharging, over-discharging, and overheating, further extending their life and safety.

Disadvantages:

  • Higher Initial Cost: The upfront cost for lithium batteries is significantly higher, typically ranging from $200-$400+ for a pair. However, their extended lifespan can lead to a lower cost of ownership over time.
  • FAA travel considerations: While many lithium batteries are designed for travel, the FAA has specific regulations. Any lithium battery for mobility purposes larger than 300 Watt-Hours is generally not in compliance for air travel, and even smaller ones may have restrictions (e.g., a maximum of one spare battery in carry-on baggage). Always check with your airline.

Comparing Battery Types

To help you visualize the differences, here’s a comparison of the key characteristics:

Feature Sealed Lead-Acid (SLA/AGM) Lithium-Ion (LiFePO4)
Average Cost (Pair) $50 – $150 $200 – $400+
Lifespan 1-2 years (300-500 cycles) 3-5+ years (2,000-3,000+ cycles)
Weight Heavier Up to 50% Lighter
Charge Time 6-10 hours 2-4 hours
Performance Standard range and power Increased range and consistent power
Maintenance Requires proper charging habits Virtually maintenance-free

DIY Oppo A54 Screen Swap: Your Ultimate How-To

Oppo A54 screen replacement: Ultimate Guide 2025

Is Your Oppo A54 Screen Damaged? Key Symptoms & Specs

Oppo a54 screen replacement is a common repair that can restore your device to full functionality, whether you tackle it yourself or trust a professional. Here’s what you need to know at a glance:

Quick Answer: Oppo A54 Screen Replacement Options

  • DIY Repair: Purchase a replacement screen for approximately 1,100-2,999 INR ($26-36 USD) and follow step-by-step guides
  • Local Repair Shop: Expect to pay around 1,500 INR for professional installation
  • Official Service Center: Premium service at approximately 3,000 INR
  • Screen Specs: Oppo A54 has a 6.51″ IPS LCD (720 x 1600px); A54 5G has a 6.5″ IPS LCD (1080 x 2400px)

A damaged screen can show several telltale signs. You might notice cracked or shattered glass on the surface, even if the display still works. Unresponsive touch is another common issue—parts of your screen won’t register your taps or swipes. Some screens develop flickering, black spots, or bright lines running across the display. These symptoms indicate it’s time for a replacement.

The Oppo A54 comes in two variants with slightly different specifications. The standard A54 features a 6.51-inch IPS LCD screen with 720 x 1600 pixel resolution. The A54 5G model has a 6.5-inch IPS LCD screen with sharper 1080 x 2400 pixel resolution. Both models include fingerprint support and use LCD technology rather than OLED.

Understanding your specific model is crucial before purchasing replacement parts. The screens are not interchangeable between models, so you’ll need to order the correct version for your device.

I’m Ralph Harris, and with over 20 years of electronics repair experience and more than 500 Apple repair certifications, I’ve guided thousands through successful oppo a54 screen replacement projects. My goal is to help you make an informed decision about repairing your device, whether you choose the DIY route or professional service.

infographic showing oppo a54 screen damage symptoms including cracked glass, unresponsive touch areas, flickering display, black spots, and bright lines, plus comparison of oppo a54 standard versus 5g screen specifications including size and resolution differences - oppo a54 screen replacement infographic brainstorm-4-items

When your Oppo A54 screen acts up, it’s pretty clear something’s amiss. Beyond the obvious cracks, you might encounter a variety of issues that scream “replace me!” For instance, if you’re trying to scroll through your favorite social media feed but your finger taps aren’t registering, you’re likely dealing with an unresponsive digitizer. Or perhaps your screen looks like a disco party with random lines and flickering lights – that’s a telltale sign of a deeper display problem. Black spots can indicate dead pixels or liquid damage, while a completely black screen, even when the phone is on, means the LCD itself has given up the ghost.

It’s important to differentiate between a cracked digitizer and a broken LCD. The digitizer is the layer responsible for touch input, often integrated with the top glass. If your screen is cracked but still displays images perfectly and responds to touch, only the glass/digitizer might be damaged. However, if you see ink-like bleeding, distorted colors, or large black spots, the LCD (Liquid Crystal Display) panel underneath is likely broken. For most Oppo A54 screen replacement scenarios, especially with significant damage, you’ll be replacing the entire screen assembly, which includes both the LCD and digitizer.

Oppo A54 Screen Specifications

Knowing your device’s exact specifications is the first step in a successful Oppo A54 screen replacement. The Oppo A54 series has a couple of variants, and their screen specs differ slightly, which is crucial for ordering the right part.

For the standard Oppo A54 model, you’re looking at a 6.51-inch IPS LCD panel with a resolution of 720 x 1600 pixels. This screen also supports fingerprint recognition, a feature that needs to be functional after your replacement.

If you own the Oppo A54 5G model, your device boasts a slightly different screen. It features a 6.5-inch IPS LCD display with a higher resolution of 1080 x 2400 pixels. Like its non-5G counterpart, it also includes fingerprint support. Both models use IPS LCD technology, which provides good color reproduction and viewing angles, but is distinct from OLED screens found in some other high-end smartphones. Ensuring you match the correct model with its specific screen type and resolution is paramount to avoid compatibility issues.

Sourcing Your Replacement: Quality Parts, Costs, and Where to Buy

Once you’ve identified the problem and your specific Oppo A54 model, the next step is finding a quality replacement screen. This is where terms like “OEM” come into play, and understanding them is key to a successful and lasting repair.

What is an OEM Screen?
OEM stands for “Original Equipment Manufacturer.” An OEM screen replacement is manufactured to the exact specifications as the original screen that came with your phone. These screens are designed to match the original display’s quality, color accuracy, touch responsiveness, and durability. When you opt for an OEM screen, you’re generally getting a part that is identical to the one your phone had when it was new. This means seamless compatibility and performance.

Other Types of Screens (Aftermarket)
Beyond OEM, you’ll find various “aftermarket” screens. These are produced by third-party manufacturers and can vary significantly in quality. Some aftermarket screens are quite good, offering a cost-effective alternative with decent performance. However, others can fall short, leading to issues like lower brightness, less accurate colors, reduced touch sensitivity, or even compatibility problems. While they might be cheaper, the compromise in quality can lead to a less satisfying user experience and potentially a shorter lifespan for the replacement part.

We believe in transparency when it comes to parts. Whether you’re considering a DIY repair or bringing your device to us, we ensure you understand the quality differences between available options. For an Oppo A54 screen replacement, we generally recommend OEM or high-quality aftermarket parts to maintain your device’s performance.

When it comes to purchasing parts, you can explore various online retailers. However, if you’re local to Mississippi, we offer high-quality replacement parts, including a Laurel Phone Repair screen replacement kit designed to meet our rigorous standards.

Understanding the Price Range for an Oppo A54 Screen Replacement

The cost of an Oppo A54 screen replacement can vary widely depending on how you approach the repair. Let’s break down the typical price ranges you might encounter:

  • DIY Part Cost: If you’re confident in your repair skills and decide to purchase the replacement screen yourself, you can find parts online. For a standard Oppo A54 or A54 5G LCD screen with touch module, prices from international suppliers like Cellspare.com can range from approximately $26 to $36 USD. This is a significant discount compared to the original display price, which could be around $183 USD if purchased through traditional channels. This option gives you the part at a wholesale rate, but remember, the “free of cost” repair labor comes with your own time and risk!

  • Online Store Pricing: While the direct part cost can be low, some online stores might package the screen with basic tools or offer different quality tiers. Always compare prices and read reviews carefully to ensure you’re getting a reliable part.

  • Local Repair Shop Cost: For those who prefer professional help without the premium price tag of an official service center, a local repair shop is a great middle-ground. In places like Laurel, Hattiesburg, or Jackson, Mississippi, you can expect to pay around $18-20 USD (approximately 1500 INR converted) for an Oppo A54 screen replacement, including both the part and labor. This offers a balance of affordability and professional expertise.

  • Official Service Center Cost: If you prioritize official support and warranty, an authorized service center might be your choice. However, this typically comes at a premium. An official service center might charge around $36-40 USD (approximately 3000 INR converted) for an Oppo A54 screen replacement. While you get guaranteed OEM parts and service, the cost is notably higher.

At Laurel Phone Repair, we pride ourselves on transparent and competitive pricing. We aim to provide quality repairs that are both affordable and reliable for our community in Mississippi. You can find More info about our pricing directly on our website.

The DIY Oppo A54 Screen Replacement Process

phone repair tool kit laid out on a clean surface - oppo a54 screen replacement

Thinking of tackling the Oppo A54 screen replacement yourself? That’s the spirit! DIY repairs can be incredibly rewarding, offering the satisfaction of fixing something with your own hands and, let’s be honest, saving some cash. However, it’s not without its challenges.

DIY Benefits: The primary allure of a DIY repair is cost savings. By purchasing the part directly, you cut out labor costs. It also gives you a deeper understanding of your device’s internal workings – a kind of tech-savvy badge of honor!

DIY Risks: On the flip side, DIY repairs come with inherent risks. Modern smartphones are complex, with delicate components and tiny connectors. A wrong move can easily damage other parts of your phone, turning a screen replacement into a more extensive, and expensive, repair. You could strip screws, tear flex cables, or even inadvertently damage the battery.

Safety Precautions: Before you even think about picking up a screwdriver, safety first!

  1. Power Off Completely: Ensure your Oppo A54 is fully powered down, not just in sleep mode.
  2. Disconnect Battery: The battery is the heart of your phone’s power. Disconnecting it is crucial to prevent short circuits and accidental power surges during the repair.
  3. Work in a Clean, Well-Lit Area: Small screws and components can easily get lost. A clean, organized workspace is your best friend.
  4. Use Proper Tools: Don’t try to pry open your phone with a kitchen knife. Using the correct tools prevents damage to the phone casing and internal components.
  5. Take Your Time: Rushing leads to mistakes. Be patient and follow each step carefully.

Step-by-Step Overview: The general process involves carefully separating the old screen, disconnecting its cables, testing the new screen, and then reassembling everything. It sounds simple, but the devil is in the details, as they say!

Tools You’ll Need for the Repair

A successful Oppo A54 screen replacement hinges on having the right tools. While some replacement screens come with a basic kit, we often recommend investing in a slightly more comprehensive set for better results and to minimize the risk of damage.

Here’s a typical list of tools you’ll need:

  • Repair Kit Contents: Many replacement screens are sold as a “complete cell phone repair kit” which often includes basic tools.
  • Prying Tools: These are essential for gently separating adhesive-held components without scratching or bending plastic. Look for plastic spudgers or thin metal pry tools.
  • Screwdrivers: You’ll need small Phillips head and possibly pentalobe or Torx screwdrivers, depending on the specific screws used in your Oppo A54. Precision is key here.
  • Suction Cup: Used to gently lift the screen assembly from the phone’s frame, especially after applying heat to loosen the adhesive.
  • Heat Gun (or Hair Dryer): Heat is crucial for softening the adhesive that holds the screen and back panel in place. Use it carefully and evenly.
  • Adhesive Strips/B-7000 Glue: Once the new screen is in, you’ll need new adhesive to secure it firmly to the frame and ensure proper sealing.
  • Professional Cleaning Paper/Microfiber Cloth: For cleaning residual adhesive and ensuring a pristine, dust-free surface before installing the new screen.

Using the correct tools not only makes the job easier but also significantly reduces the chance of damaging your device.

A Step-by-Step Guide to Swapping Your Screen

Now for the main event: the actual Oppo A54 screen replacement. This guide provides a general overview. Always refer to a specific video guide for your exact Oppo A54 model (standard or 5G) before starting.

  1. Powering Off Phone: This is paramount. Hold down the power button and select “Power off” to completely shut down your device. Safety first, always!
  2. Applying Heat: Use a heat gun or hairdryer to gently warm the edges of the screen and the back panel. This softens the adhesive, making it easier to separate components. Apply heat evenly for about 30-60 seconds at a time, being careful not to overheat any single spot.
  3. Removing Back Panel: With the adhesive softened, use a suction cup to create a small gap, then insert a thin prying tool (like a plastic spudger). Carefully work your way around the edges, gently separating the back panel from the frame. Be mindful of any flex cables connecting the back panel (e.g., fingerprint sensor) to the motherboard.
  4. Disconnecting Battery: Once the back panel is off, you’ll usually see a metal shield covering the battery connector. Remove any screws holding it in place, then use a plastic spudger to gently pry up and disconnect the battery flex cable. This cuts off power to the device, preventing accidental shorts.
  5. Disconnecting Screen Flex Cable: Locate the screen’s flex cable connector(s) on the motherboard. These are typically covered by a small metal bracket secured with screws. Remove the screws and bracket, then use a plastic spudger to carefully disconnect the old screen’s flex cables.
  6. Removing Old Screen: With all connections severed and adhesive softened, you can now carefully remove the old, damaged screen from the phone’s frame. Clean any remaining adhesive residue from the frame thoroughly using isopropyl alcohol and a microfiber cloth.
  7. Testing New Screen: Before permanently installing the new screen, connect its flex cables to the motherboard (but don’t stick it down yet). Reconnect the battery. Power on your phone and test the new screen’s functionality: check display clarity, touch responsiveness across the entire screen, brightness, and any other features like fingerprint recognition. If everything works, power off the phone and disconnect the battery again.
  8. Installing New Screen: Apply new adhesive strips or a thin, even bead of B-7000 glue around the phone’s frame where the screen sits. Carefully place the new screen into the frame, ensuring it’s properly aligned. Press gently but firmly around the edges to secure the adhesive.
  9. Reassembly: Reconnect the screen flex cables, secure their metal brackets, reconnect the battery, and replace its shield/screws. Carefully reattach the back panel, ensuring all flex cables are clear and the adhesive seals properly. Apply gentle pressure or use clamps for a few hours to allow the adhesive to cure.

And voilà! With patience and careful execution, you’ve completed your Oppo A54 screen replacement.

DIY vs. Professional Repair: Weighing the Pros, Cons, and Policies

Deciding whether to attempt a DIY Oppo A54 screen replacement or take it to a professional is a common dilemma. Both options have their merits and drawbacks. Let’s compare them to help you make an informed decision.

Feature DIY Repair Professional Repair (e.g., Laurel Phone Repair)
Cost Lower initial part cost (e.g., $26-$36 USD for the screen). Higher overall cost (e.g., $18-$40 USD for part + labor).
Time Can be lengthy for beginners (1-3+ hours), depends on skill and tools. Quick turnaround (often 30-60 minutes, depending on shop and damage).
Risk High risk of further damage, voiding warranty, or improper installation. Low risk of further damage; trained technicians with specialized tools.
Warranty Part warranty only (if purchased separately); no labor warranty. Typically includes warranty on both parts and labor (e.g., 6 months).
Expertise Requires research, patience, and some technical aptitude. Experienced technicians with specialized knowledge and tools.

DIY Pros:

  • Cost Savings: As mentioned, buying the part yourself can significantly reduce the overall expense. For an Oppo A54, the part might cost around $26-36 USD, while professional services range from $18-40 USD plus the part cost.
  • Learning Experience: It’s a great way to understand the inner workings of your phone and develop new skills.
  • Immediate Gratification: If you have the part and tools, you can fix it right away without waiting for a repair shop appointment.

DIY Cons:

  • Risk of Damage: The biggest con. One wrong move, and you could damage other delicate components, turning a simple screen replacement into a much more expensive problem.
  • Voiding Warranty: Attempting a DIY repair almost always voids any remaining manufacturer warranty on your device.
  • Time and Frustration: It can be a time-consuming and frustrating process, especially for first-timers.
  • Tool Investment: You might need to buy specialized tools, which adds to the initial cost.

Professional Repair Benefits:

  • Expertise and Experience: Our technicians, like Ralph Harris with over 20 years of experience, have the knowledge and steady hands to perform intricate repairs safely and efficiently. We’ve seen it all in Laurel, Hattiesburg, and Jackson, Mississippi!
  • Speed and Convenience: We can often complete an Oppo A54 screen replacement quickly, getting your phone back in your hands sooner.
  • Repair Warranty: Most reputable repair shops, including Laurel Phone Repair, offer a warranty on both the parts used and the labor performed. This provides peace of mind that if something goes wrong, you’re covered.
  • Proper Tools and Environment: Professionals have access to specialized tools and a clean, anti-static environment, reducing the risk of accidental damage.

The choice depends on your comfort level, budget, and the value you place on your time and peace of mind. If you’re in Mississippi and prefer to leave it to the experts, check out Our expert services.

Whether you’re buying a replacement screen for a DIY project or having a professional install it, understanding the warranty and return policies for parts is crucial. These policies protect your investment and ensure you receive a functional component.

Part Warranty Period:
For individually purchased parts, such as an Oppo A54 screen, a common warranty period is 6 months. This warranty typically covers functional issues, meaning if the display stops showing anything, develops dead pixels, or the touch becomes unresponsive due to a manufacturing defect, you may be eligible for a replacement. It’s important that the part is returned in the same condition as received, with all protective films and stickers intact.

Return Period:
Beyond the warranty, there’s often a separate return period for initially damaged, defective, wrong, or missing items. This is commonly 10 days from delivery. If you receive a part that is visibly broken, doesn’t match your order, or is missing components, you usually have this short window to initiate a return for a full refund or replacement.

Warranty Conditions and Exclusions:

  • Physical Damage Exclusion: This is a big one. The 6-month replacement warranty does not cover physical damage such as lining cracks or spots appearing during or after installation. If you drop the phone after a DIY replacement, or if you accidentally damage the new screen during installation, that’s generally on you. This is a significant risk of DIY repair.
  • Warranty Stickers/Protection Film: To be eligible for a warranty claim, ensure you do not remove the warranty protection film, stickers, or stamp from the new screen until you have fully tested it and are certain it works perfectly. Removing these often voids the warranty. We always recommend testing the new screen thoroughly before permanent installation.

Professional Repair Warranty:
When you choose a professional repair service like ours at Laurel Phone Repair, you get an added layer of protection. Our repairs typically come with our own warranty that covers both the replacement part and the labor involved. This means if the screen we installed fails due to a defect within our warranty period, we’ll fix it for you, often at no additional cost. This provides significantly more peace of mind compared to a DIY repair where you’re solely responsible for any issues that arise after installation.

Conclusion

repaired Oppo A54 with a pristine, functional screen - oppo a54 screen replacement

Whether you’re dealing with a cracked display, unresponsive touch, or flickering lines, an Oppo A54 screen replacement is a common and often necessary repair. We’ve explored the journey from diagnosing the damage to sourcing parts and performing the swap.

The DIY option offers the allure of cost savings and the satisfaction of a job well done. With parts potentially costing as little as $26-36 USD, it’s an attractive route for the technically inclined and patient individual. However, it comes with inherent risks of causing further damage, voiding warranties, and the challenge of navigating intricate phone components.

On the other hand, professional repair at a trusted shop like Laurel Phone Repair provides peace of mind. With experienced technicians, specialized tools, and a warranty covering both parts and labor, you minimize risk and get your device back quickly and reliably. Our team in Laurel, Hattiesburg, and Jackson, Mississippi, is equipped to handle your Oppo A54 screen replacement with expertise and care.

Making the right choice for your Oppo A54 screen replacement boils down to your comfort level with delicate electronics, your budget, and how much you value a professional guarantee. We’re here to support you, whether you need advice on a DIY project or prefer to let our experts handle the repair.

Ready to get your Oppo A54 looking and working like new? Don’t hesitate to reach out. You can Schedule your Screen Repair with us today!

Join our mailing list for the latest updates and special offers.

Sign up for our newsletter to receive exclusive promotions and repair tips straight to your inbox.