Oppo A54 screen replacement: Ultimate Guide 2025
Is Your Oppo A54 Screen Damaged? Key Symptoms & Specs
Oppo a54 screen replacement is a common repair that can restore your device to full functionality, whether you tackle it yourself or trust a professional. Here’s what you need to know at a glance:
Quick Answer: Oppo A54 Screen Replacement Options
- DIY Repair: Purchase a replacement screen for approximately 1,100-2,999 INR ($26-36 USD) and follow step-by-step guides
- Local Repair Shop: Expect to pay around 1,500 INR for professional installation
- Official Service Center: Premium service at approximately 3,000 INR
- Screen Specs: Oppo A54 has a 6.51″ IPS LCD (720 x 1600px); A54 5G has a 6.5″ IPS LCD (1080 x 2400px)
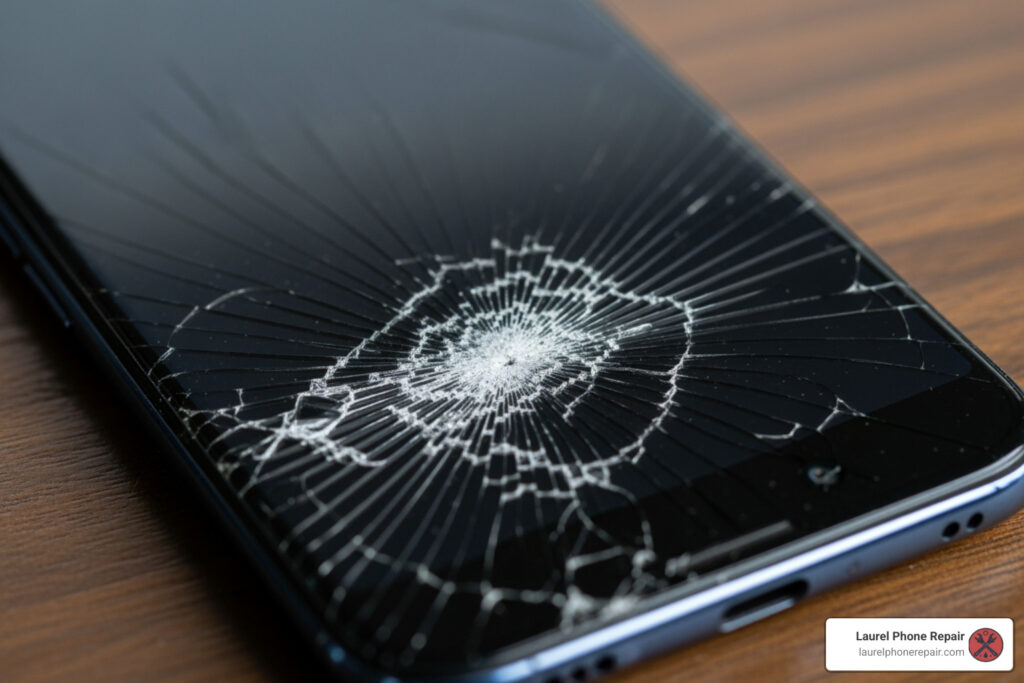
A damaged screen can show several telltale signs. You might notice cracked or shattered glass on the surface, even if the display still works. Unresponsive touch is another common issue—parts of your screen won’t register your taps or swipes. Some screens develop flickering, black spots, or bright lines running across the display. These symptoms indicate it’s time for a replacement.
The Oppo A54 comes in two variants with slightly different specifications. The standard A54 features a 6.51-inch IPS LCD screen with 720 x 1600 pixel resolution. The A54 5G model has a 6.5-inch IPS LCD screen with sharper 1080 x 2400 pixel resolution. Both models include fingerprint support and use LCD technology rather than OLED.
Understanding your specific model is crucial before purchasing replacement parts. The screens are not interchangeable between models, so you’ll need to order the correct version for your device.
I’m Ralph Harris, and with over 20 years of electronics repair experience and more than 500 Apple repair certifications, I’ve guided thousands through successful oppo a54 screen replacement projects. My goal is to help you make an informed decision about repairing your device, whether you choose the DIY route or professional service.

When your Oppo A54 screen acts up, it’s pretty clear something’s amiss. Beyond the obvious cracks, you might encounter a variety of issues that scream “replace me!” For instance, if you’re trying to scroll through your favorite social media feed but your finger taps aren’t registering, you’re likely dealing with an unresponsive digitizer. Or perhaps your screen looks like a disco party with random lines and flickering lights – that’s a telltale sign of a deeper display problem. Black spots can indicate dead pixels or liquid damage, while a completely black screen, even when the phone is on, means the LCD itself has given up the ghost.
It’s important to differentiate between a cracked digitizer and a broken LCD. The digitizer is the layer responsible for touch input, often integrated with the top glass. If your screen is cracked but still displays images perfectly and responds to touch, only the glass/digitizer might be damaged. However, if you see ink-like bleeding, distorted colors, or large black spots, the LCD (Liquid Crystal Display) panel underneath is likely broken. For most Oppo A54 screen replacement scenarios, especially with significant damage, you’ll be replacing the entire screen assembly, which includes both the LCD and digitizer.
Oppo A54 Screen Specifications
Knowing your device’s exact specifications is the first step in a successful Oppo A54 screen replacement. The Oppo A54 series has a couple of variants, and their screen specs differ slightly, which is crucial for ordering the right part.
For the standard Oppo A54 model, you’re looking at a 6.51-inch IPS LCD panel with a resolution of 720 x 1600 pixels. This screen also supports fingerprint recognition, a feature that needs to be functional after your replacement.
If you own the Oppo A54 5G model, your device boasts a slightly different screen. It features a 6.5-inch IPS LCD display with a higher resolution of 1080 x 2400 pixels. Like its non-5G counterpart, it also includes fingerprint support. Both models use IPS LCD technology, which provides good color reproduction and viewing angles, but is distinct from OLED screens found in some other high-end smartphones. Ensuring you match the correct model with its specific screen type and resolution is paramount to avoid compatibility issues.
Sourcing Your Replacement: Quality Parts, Costs, and Where to Buy
Once you’ve identified the problem and your specific Oppo A54 model, the next step is finding a quality replacement screen. This is where terms like “OEM” come into play, and understanding them is key to a successful and lasting repair.
What is an OEM Screen?
OEM stands for “Original Equipment Manufacturer.” An OEM screen replacement is manufactured to the exact specifications as the original screen that came with your phone. These screens are designed to match the original display’s quality, color accuracy, touch responsiveness, and durability. When you opt for an OEM screen, you’re generally getting a part that is identical to the one your phone had when it was new. This means seamless compatibility and performance.
Other Types of Screens (Aftermarket)
Beyond OEM, you’ll find various “aftermarket” screens. These are produced by third-party manufacturers and can vary significantly in quality. Some aftermarket screens are quite good, offering a cost-effective alternative with decent performance. However, others can fall short, leading to issues like lower brightness, less accurate colors, reduced touch sensitivity, or even compatibility problems. While they might be cheaper, the compromise in quality can lead to a less satisfying user experience and potentially a shorter lifespan for the replacement part.
We believe in transparency when it comes to parts. Whether you’re considering a DIY repair or bringing your device to us, we ensure you understand the quality differences between available options. For an Oppo A54 screen replacement, we generally recommend OEM or high-quality aftermarket parts to maintain your device’s performance.
When it comes to purchasing parts, you can explore various online retailers. However, if you’re local to Mississippi, we offer high-quality replacement parts, including a Laurel Phone Repair screen replacement kit designed to meet our rigorous standards.
Understanding the Price Range for an Oppo A54 Screen Replacement
The cost of an Oppo A54 screen replacement can vary widely depending on how you approach the repair. Let’s break down the typical price ranges you might encounter:
-
DIY Part Cost: If you’re confident in your repair skills and decide to purchase the replacement screen yourself, you can find parts online. For a standard Oppo A54 or A54 5G LCD screen with touch module, prices from international suppliers like Cellspare.com can range from approximately $26 to $36 USD. This is a significant discount compared to the original display price, which could be around $183 USD if purchased through traditional channels. This option gives you the part at a wholesale rate, but remember, the “free of cost” repair labor comes with your own time and risk!
-
Online Store Pricing: While the direct part cost can be low, some online stores might package the screen with basic tools or offer different quality tiers. Always compare prices and read reviews carefully to ensure you’re getting a reliable part.
-
Local Repair Shop Cost: For those who prefer professional help without the premium price tag of an official service center, a local repair shop is a great middle-ground. In places like Laurel, Hattiesburg, or Jackson, Mississippi, you can expect to pay around $18-20 USD (approximately 1500 INR converted) for an Oppo A54 screen replacement, including both the part and labor. This offers a balance of affordability and professional expertise.
-
Official Service Center Cost: If you prioritize official support and warranty, an authorized service center might be your choice. However, this typically comes at a premium. An official service center might charge around $36-40 USD (approximately 3000 INR converted) for an Oppo A54 screen replacement. While you get guaranteed OEM parts and service, the cost is notably higher.
At Laurel Phone Repair, we pride ourselves on transparent and competitive pricing. We aim to provide quality repairs that are both affordable and reliable for our community in Mississippi. You can find More info about our pricing directly on our website.
The DIY Oppo A54 Screen Replacement Process

Thinking of tackling the Oppo A54 screen replacement yourself? That’s the spirit! DIY repairs can be incredibly rewarding, offering the satisfaction of fixing something with your own hands and, let’s be honest, saving some cash. However, it’s not without its challenges.
DIY Benefits: The primary allure of a DIY repair is cost savings. By purchasing the part directly, you cut out labor costs. It also gives you a deeper understanding of your device’s internal workings – a kind of tech-savvy badge of honor!
DIY Risks: On the flip side, DIY repairs come with inherent risks. Modern smartphones are complex, with delicate components and tiny connectors. A wrong move can easily damage other parts of your phone, turning a screen replacement into a more extensive, and expensive, repair. You could strip screws, tear flex cables, or even inadvertently damage the battery.
Safety Precautions: Before you even think about picking up a screwdriver, safety first!
- Power Off Completely: Ensure your Oppo A54 is fully powered down, not just in sleep mode.
- Disconnect Battery: The battery is the heart of your phone’s power. Disconnecting it is crucial to prevent short circuits and accidental power surges during the repair.
- Work in a Clean, Well-Lit Area: Small screws and components can easily get lost. A clean, organized workspace is your best friend.
- Use Proper Tools: Don’t try to pry open your phone with a kitchen knife. Using the correct tools prevents damage to the phone casing and internal components.
- Take Your Time: Rushing leads to mistakes. Be patient and follow each step carefully.
Step-by-Step Overview: The general process involves carefully separating the old screen, disconnecting its cables, testing the new screen, and then reassembling everything. It sounds simple, but the devil is in the details, as they say!
Tools You’ll Need for the Repair
A successful Oppo A54 screen replacement hinges on having the right tools. While some replacement screens come with a basic kit, we often recommend investing in a slightly more comprehensive set for better results and to minimize the risk of damage.
Here’s a typical list of tools you’ll need:
- Repair Kit Contents: Many replacement screens are sold as a “complete cell phone repair kit” which often includes basic tools.
- Prying Tools: These are essential for gently separating adhesive-held components without scratching or bending plastic. Look for plastic spudgers or thin metal pry tools.
- Screwdrivers: You’ll need small Phillips head and possibly pentalobe or Torx screwdrivers, depending on the specific screws used in your Oppo A54. Precision is key here.
- Suction Cup: Used to gently lift the screen assembly from the phone’s frame, especially after applying heat to loosen the adhesive.
- Heat Gun (or Hair Dryer): Heat is crucial for softening the adhesive that holds the screen and back panel in place. Use it carefully and evenly.
- Adhesive Strips/B-7000 Glue: Once the new screen is in, you’ll need new adhesive to secure it firmly to the frame and ensure proper sealing.
- Professional Cleaning Paper/Microfiber Cloth: For cleaning residual adhesive and ensuring a pristine, dust-free surface before installing the new screen.
Using the correct tools not only makes the job easier but also significantly reduces the chance of damaging your device.
A Step-by-Step Guide to Swapping Your Screen
Now for the main event: the actual Oppo A54 screen replacement. This guide provides a general overview. Always refer to a specific video guide for your exact Oppo A54 model (standard or 5G) before starting.
- Powering Off Phone: This is paramount. Hold down the power button and select “Power off” to completely shut down your device. Safety first, always!
- Applying Heat: Use a heat gun or hairdryer to gently warm the edges of the screen and the back panel. This softens the adhesive, making it easier to separate components. Apply heat evenly for about 30-60 seconds at a time, being careful not to overheat any single spot.
- Removing Back Panel: With the adhesive softened, use a suction cup to create a small gap, then insert a thin prying tool (like a plastic spudger). Carefully work your way around the edges, gently separating the back panel from the frame. Be mindful of any flex cables connecting the back panel (e.g., fingerprint sensor) to the motherboard.
- Disconnecting Battery: Once the back panel is off, you’ll usually see a metal shield covering the battery connector. Remove any screws holding it in place, then use a plastic spudger to gently pry up and disconnect the battery flex cable. This cuts off power to the device, preventing accidental shorts.
- Disconnecting Screen Flex Cable: Locate the screen’s flex cable connector(s) on the motherboard. These are typically covered by a small metal bracket secured with screws. Remove the screws and bracket, then use a plastic spudger to carefully disconnect the old screen’s flex cables.
- Removing Old Screen: With all connections severed and adhesive softened, you can now carefully remove the old, damaged screen from the phone’s frame. Clean any remaining adhesive residue from the frame thoroughly using isopropyl alcohol and a microfiber cloth.
- Testing New Screen: Before permanently installing the new screen, connect its flex cables to the motherboard (but don’t stick it down yet). Reconnect the battery. Power on your phone and test the new screen’s functionality: check display clarity, touch responsiveness across the entire screen, brightness, and any other features like fingerprint recognition. If everything works, power off the phone and disconnect the battery again.
- Installing New Screen: Apply new adhesive strips or a thin, even bead of B-7000 glue around the phone’s frame where the screen sits. Carefully place the new screen into the frame, ensuring it’s properly aligned. Press gently but firmly around the edges to secure the adhesive.
- Reassembly: Reconnect the screen flex cables, secure their metal brackets, reconnect the battery, and replace its shield/screws. Carefully reattach the back panel, ensuring all flex cables are clear and the adhesive seals properly. Apply gentle pressure or use clamps for a few hours to allow the adhesive to cure.
And voilà! With patience and careful execution, you’ve completed your Oppo A54 screen replacement.
DIY vs. Professional Repair: Weighing the Pros, Cons, and Policies
Deciding whether to attempt a DIY Oppo A54 screen replacement or take it to a professional is a common dilemma. Both options have their merits and drawbacks. Let’s compare them to help you make an informed decision.
| Feature | DIY Repair | Professional Repair (e.g., Laurel Phone Repair) |
|---|---|---|
| Cost | Lower initial part cost (e.g., $26-$36 USD for the screen). | Higher overall cost (e.g., $18-$40 USD for part + labor). |
| Time | Can be lengthy for beginners (1-3+ hours), depends on skill and tools. | Quick turnaround (often 30-60 minutes, depending on shop and damage). |
| Risk | High risk of further damage, voiding warranty, or improper installation. | Low risk of further damage; trained technicians with specialized tools. |
| Warranty | Part warranty only (if purchased separately); no labor warranty. | Typically includes warranty on both parts and labor (e.g., 6 months). |
| Expertise | Requires research, patience, and some technical aptitude. | Experienced technicians with specialized knowledge and tools. |
DIY Pros:
- Cost Savings: As mentioned, buying the part yourself can significantly reduce the overall expense. For an Oppo A54, the part might cost around $26-36 USD, while professional services range from $18-40 USD plus the part cost.
- Learning Experience: It’s a great way to understand the inner workings of your phone and develop new skills.
- Immediate Gratification: If you have the part and tools, you can fix it right away without waiting for a repair shop appointment.
DIY Cons:
- Risk of Damage: The biggest con. One wrong move, and you could damage other delicate components, turning a simple screen replacement into a much more expensive problem.
- Voiding Warranty: Attempting a DIY repair almost always voids any remaining manufacturer warranty on your device.
- Time and Frustration: It can be a time-consuming and frustrating process, especially for first-timers.
- Tool Investment: You might need to buy specialized tools, which adds to the initial cost.
Professional Repair Benefits:
- Expertise and Experience: Our technicians, like Ralph Harris with over 20 years of experience, have the knowledge and steady hands to perform intricate repairs safely and efficiently. We’ve seen it all in Laurel, Hattiesburg, and Jackson, Mississippi!
- Speed and Convenience: We can often complete an Oppo A54 screen replacement quickly, getting your phone back in your hands sooner.
- Repair Warranty: Most reputable repair shops, including Laurel Phone Repair, offer a warranty on both the parts used and the labor performed. This provides peace of mind that if something goes wrong, you’re covered.
- Proper Tools and Environment: Professionals have access to specialized tools and a clean, anti-static environment, reducing the risk of accidental damage.
The choice depends on your comfort level, budget, and the value you place on your time and peace of mind. If you’re in Mississippi and prefer to leave it to the experts, check out Our expert services.
Navigating Warranty and Return Policies for Parts
Whether you’re buying a replacement screen for a DIY project or having a professional install it, understanding the warranty and return policies for parts is crucial. These policies protect your investment and ensure you receive a functional component.
Part Warranty Period:
For individually purchased parts, such as an Oppo A54 screen, a common warranty period is 6 months. This warranty typically covers functional issues, meaning if the display stops showing anything, develops dead pixels, or the touch becomes unresponsive due to a manufacturing defect, you may be eligible for a replacement. It’s important that the part is returned in the same condition as received, with all protective films and stickers intact.
Return Period:
Beyond the warranty, there’s often a separate return period for initially damaged, defective, wrong, or missing items. This is commonly 10 days from delivery. If you receive a part that is visibly broken, doesn’t match your order, or is missing components, you usually have this short window to initiate a return for a full refund or replacement.
Warranty Conditions and Exclusions:
- Physical Damage Exclusion: This is a big one. The 6-month replacement warranty does not cover physical damage such as lining cracks or spots appearing during or after installation. If you drop the phone after a DIY replacement, or if you accidentally damage the new screen during installation, that’s generally on you. This is a significant risk of DIY repair.
- Warranty Stickers/Protection Film: To be eligible for a warranty claim, ensure you do not remove the warranty protection film, stickers, or stamp from the new screen until you have fully tested it and are certain it works perfectly. Removing these often voids the warranty. We always recommend testing the new screen thoroughly before permanent installation.
Professional Repair Warranty:
When you choose a professional repair service like ours at Laurel Phone Repair, you get an added layer of protection. Our repairs typically come with our own warranty that covers both the replacement part and the labor involved. This means if the screen we installed fails due to a defect within our warranty period, we’ll fix it for you, often at no additional cost. This provides significantly more peace of mind compared to a DIY repair where you’re solely responsible for any issues that arise after installation.
Conclusion

Whether you’re dealing with a cracked display, unresponsive touch, or flickering lines, an Oppo A54 screen replacement is a common and often necessary repair. We’ve explored the journey from diagnosing the damage to sourcing parts and performing the swap.
The DIY option offers the allure of cost savings and the satisfaction of a job well done. With parts potentially costing as little as $26-36 USD, it’s an attractive route for the technically inclined and patient individual. However, it comes with inherent risks of causing further damage, voiding warranties, and the challenge of navigating intricate phone components.
On the other hand, professional repair at a trusted shop like Laurel Phone Repair provides peace of mind. With experienced technicians, specialized tools, and a warranty covering both parts and labor, you minimize risk and get your device back quickly and reliably. Our team in Laurel, Hattiesburg, and Jackson, Mississippi, is equipped to handle your Oppo A54 screen replacement with expertise and care.
Making the right choice for your Oppo A54 screen replacement boils down to your comfort level with delicate electronics, your budget, and how much you value a professional guarantee. We’re here to support you, whether you need advice on a DIY project or prefer to let our experts handle the repair.
Ready to get your Oppo A54 looking and working like new? Don’t hesitate to reach out. You can Schedule your Screen Repair with us today!